
User Manual
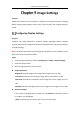


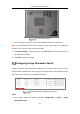


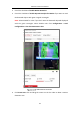
Table Of Contents
- Chapter 1 System Requirement
- Chapter 2 Network Connection
- Chapter 3 Access to the Network Camera
- Chapter 4 Wi-Fi Settings
- Chapter 5 Live View
- Chapter 6 Network Camera Configuration
- Chapter 7 Network Settings
- 7.1 Configuring Basic Settings
- 7.2 Configure Advanced Settings
- 7.2.1 Configuring SNMP Settings
- 7.2.2 Configuring FTP Settings
- 7.2.3 Configuring Email Settings
- 7.2.4 Platform Access
- 7.2.5 Wireless Dial
- 7.2.6 HTTPS Settings
- 7.2.7 Configuring QoS Settings
- 7.2.8 Configuring 802.1X Settings
- 7.2.9 Integration Protocol
- 7.2.10 Bandwidth Adaptation
- 7.2.11 Network Service
- 7.2.12 Smooth Streaming
- 7.2.13 Security Control Panel Configuration
- Chapter 8 Video/Audio Settings
- Chapter 9 Image Settings
- Chapter 10 Event Settings
- Chapter 11 Storage Settings
- Chapter 12 Playback
- Chapter 13 Picture
- Appendix
- Appendix 1 SADP Software Introduction
- Appendix 2 Port Mapping
- Appendix 3

Network Camera User Manual
101
The Exposure Time refers to the electronic shutter time, which ranges from 1 to
1/100,000s. Adjust it according to the actual luminance condition.
Gain of image can also be manually configured from 0 to 100. The bigger the value
is, the brighter would the image be, and the noise would be amplified to a larger
extent.
Exposure Settings
Focus
For camera support motor-driven lens, you can set the focus mode as Auto,
Manual or Semi-auto.
Auto: Camera focus is adjusted automatically according to the actual monitoring
scenario.
Manual: You can control the lens by adjusting the zoom, focus, lens initialization,
and auxiliary focus manually.
Semi-Auto: Camera will focus automatically when you adjust the zoom
parameters.
Day/Night Switch
Select the Day/Night Switch mode according to different surveillance demand.
Day, Night, Auto, Scheduled-Switch, and Triggered by alarm input are selectable
for day/night switch.
Day/Night Switch
Day: the camera stays at day mode.