
User Manual
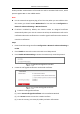
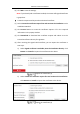

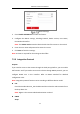

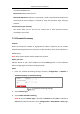
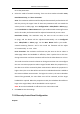
Table Of Contents
- Chapter 1 System Requirement
- Chapter 2 Network Connection
- Chapter 3 Access to the Network Camera
- Chapter 4 Wi-Fi Settings
- Chapter 5 Live View
- Chapter 6 Network Camera Configuration
- Chapter 7 Network Settings
- 7.1 Configuring Basic Settings
- 7.2 Configure Advanced Settings
- 7.2.1 Configuring SNMP Settings
- 7.2.2 Configuring FTP Settings
- 7.2.3 Configuring Email Settings
- 7.2.4 Platform Access
- 7.2.5 Wireless Dial
- 7.2.6 HTTPS Settings
- 7.2.7 Configuring QoS Settings
- 7.2.8 Configuring 802.1X Settings
- 7.2.9 Integration Protocol
- 7.2.10 Bandwidth Adaptation
- 7.2.11 Network Service
- 7.2.12 Smooth Streaming
- 7.2.13 Security Control Panel Configuration
- Chapter 8 Video/Audio Settings
- Chapter 9 Image Settings
- Chapter 10 Event Settings
- Chapter 11 Storage Settings
- Chapter 12 Playback
- Chapter 13 Picture
- Appendix
- Appendix 1 SADP Software Introduction
- Appendix 2 Port Mapping
- Appendix 3

Network Camera User Manual
84
5. There will be the certificate information after your successfully creating and
installing the certificate.
Installed Certificate
6. Export and save the certificate for verification when adding the device to client
software.
Note:
The exported certificate should be saved in the certificate folder of your client
software before adding the device to your PC client.
7. Click the Save button to save the settings.
7.2.7 Configuring QoS Settings
Purpose:
QoS (Quality of Service) can help solve the network delay and network congestion by
configuring the priority of data sending.
Steps:
1. Enter the QoS Settings interface: Configuration > Network > Advanced Settings >
QoS
QoS Settings