
User Manual

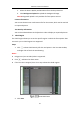
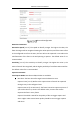
Table Of Contents
- Chapter 1 System Requirement
- Chapter 2 Network Connection
- Chapter 3 Access to the Network Camera
- Chapter 4 Wi-Fi Settings
- Chapter 5 Live View
- Chapter 6 Network Camera Configuration
- Chapter 7 Network Settings
- 7.1 Configuring Basic Settings
- 7.2 Configure Advanced Settings
- 7.2.1 Configuring SNMP Settings
- 7.2.2 Configuring FTP Settings
- 7.2.3 Configuring Email Settings
- 7.2.4 Platform Access
- 7.2.5 Wireless Dial
- 7.2.6 HTTPS Settings
- 7.2.7 Configuring QoS Settings
- 7.2.8 Configuring 802.1X Settings
- 7.2.9 Integration Protocol
- 7.2.10 Bandwidth Adaptation
- 7.2.11 Network Service
- 7.2.12 Smooth Streaming
- 7.2.13 Security Control Panel Configuration
- Chapter 8 Video/Audio Settings
- Chapter 9 Image Settings
- Chapter 10 Event Settings
- Chapter 11 Storage Settings
- Chapter 12 Playback
- Chapter 13 Picture
- Appendix
- Appendix 1 SADP Software Introduction
- Appendix 2 Port Mapping
- Appendix 3

Network Camera User Manual
131
Example: if you set the value as 60, the action can be counted as a region exiting
action only when 40 percent body part exits the region.
Note: Only certain camera models support Sensitivity function.
8. Repeat the above steps to configure other regions. Up to 4 regions can be set. You
can click the Clear button to clear all pre-defined regions.
9. Click Arming Schedule to set the arming schedule.
10. Click Linkage Method to select the linkage methods for intrusion detection,
including Notify Surveillance Center, Send Email, Upload to FTP/Memory
Card/NAS, Trigger Recording, Trigger Alarm Output, Flashing Alarm and Audible
Warning.
Note: Only certain models support Trigger Recording, Trigger Alarm Output,
Flashing Alarm and Audible Warning.
11. Click Save to save the settings.
Face Capture
The camera can capture the face that appears in the configured area, and the face
information will be uploaded with the captured picture as well.
Note: Only certain camera models support the function.
Overlay & Capture
Display VCA info. on Stream: The red frames will be displayed on the target if in a
live view or playback.
Display Target info. on Alarm Picture: There will be a frame on the target on the
uploaded alarm picture if the checkbox is checked.
Snapshot Settings:
Target Picture Settings
a. Select the target picture size. Four types are available: Custom, Head
Shot, Half-Body Shot and Full-Body Shot. If you select the Custom, you
can customize the width, head height and body height as required.
b. Check the Fixed Value to set the picture height.
Background Picture Settings