
User Manual

55
Video Recording and Picture Capture
This part introduces the operations of capturing video clips and snapshots, playback, and downloading captured files.
This part introduces the configuration of several common storage paths.
I. Set Memory Card
If you choose to store the files to memory card, make sure you insert and format the memory card in advance.
Before You Start
Insert the memory card to the camera. For detailed installation, refer to Quick Start Guide of the camera.
Steps
1. Go to storage management setting page: Configuration → Storage → Storage Management → HDD Management.
2. Select the memory card, and click Format to start initializing the memory card.
The Status of memory card turns to Normal from Uninitialized, which means the memory card can be used normally.
3. Optional: Define the Quota of the memory card. Input the quota percentage for different contents according to your need.
4. Click Save.
II. Set NAS
Take network server as network disk to store the record files, captured images, etc.
Before You Start
Get the IP address of the network disk first.
Steps
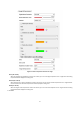
1. Go to NAS setting page: Configuration → Storage → Storage Management → Net HDD.
2. Click HDD No. Select Mounting Type and set parameters for the disk.
Server Address
The IP address of the network disk.
File Path
The saving path of network disk files.
User Name and Password
The user name and password of the net HDD.
3. Click Test to check whether the network disk is available.
4. Click Save.
III. Set FTP
You can configure the FTP server to save images which are captured by events or a timed snapshot task.
Before You Start
Get the FTP server address first.