
User Manual


30
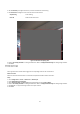
6. Check Display Face Temperature Position to show a cursor on the position of max. temperature.
7. Select Configuration mode. Targeting refers to measure the temperatures for all the targets in the scene, and output alarm if
the target temperature is higher than the alarm threshold.
Note
If temperatures of multiple targets are higher than the alarm threshold, then multiple alarms will be triggered.
8. Set the face detection parameters.
Pupil Distance: The pupil distance refers to the square size composed by the area between two pupils, and it is the basic
standard for a camera to identify a target. You can enter the pupil distance value or draw pupil distance areas in live view.
Generation Speed: It refers to the target generation speed. The higher the value is, the easier the target can be detected.
Sensitivity: It refers to face detection sensitivity.
Alarm When Temperature is Above: It refers to the temperature alarm threshold. When the target temperature is higher
than the setting value, the device outputs alarm.
Pre-Alarm Temperature: When the face temperature is higher than the set value, the device outputs pre-alarm and upload
captured face image.
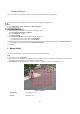
9. Click Draw Area, and draw a face detection area in live view. You can move the rectangle or drag the corners of rectangle to
adjust the position and size.
Note
You should draw the detection area within the red rectangle.
10. Click Save.
11. Set the arming schedule and linkage methods. For the information about arming schedule settings, see Set Arming Schedule.
For the information about linkage methods, see Linkage Method Settings.
The camera can capture the face that appears in the configured area, and the face information will be uploaded with the captured
picture as well.
I. Overlay and Capture
Steps:
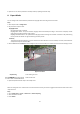
1. Go to Configuration>Body Thermography >Face Capture >Overlay and Capture.
2. Check Display Target info. on Alarm Picture to show a frame on the target on the uploaded alarm picture.
3. Set the target picture size. Four types are available: Custom, Head Shot, Half-Body Shot and Full-Body Shot. If you select Custom,
you can customized the width, head height and body height as required.
4. Check Fixed Value to set the picture height.
5. Check the Background Upload to upload the background image.
6. Select the Picture Quality and Resolution from the drop-down list.
7. Click Save.