
User Manual


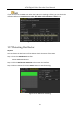


Table Of Contents
- Product Key Features
- Chapter 1 Introduction
- Chapter 2 Getting Started
- 2.1 Starting Up and Shutting Down the DVR
- 2.2 Activating the Device
- 2.3 Using the Unlock Pattern for Login
- 2.4 Basic Configuration in Startup Wizard
- 2.5 Login and Logout
- 2.6 Resetting Your Password
- 2.7 Adding and Connecting the IP Cameras
- 2.8 Configuring Custom Protocols
- 2.9 Configuring Signal Input Channel
- Chapter 3 Live View
- Chapter 4 PTZ Controls
- Chapter 5 Recording and Capture Settings
- 5.1 Configuring Encoding Parameters
- 5.2 Configuring Recording and Capture Schedule
- 5.3 Configuring Motion Detection Recording and Capture
- 5.4 Configuring Alarm Triggered Recording and Capture
- 5.5 Configuring Command Triggered Recording and Capture
- 5.6 Configuring Manual Recording and Continous Capture
- 5.7 Configuring Holiday Recording and Capture
- 5.8 Configuring Redundant Recording and Capture
- 5.9 Configuring HDD Group
- 5.10 Files Protection
- 5.11 One-Key Enabling and Disabling H.264+ for Analog Cameras
- Chapter 6 Playback
- 6.1 Playing Back Record Files
- 6.2 Auxiliary Functions of Playback
- Chapter 7 Backup
- Chapter 8 Alarm Settings
- Chapter 9 Smart ATM Settings
- Chapter 10 Network Settings
- Chapter 11 ATM Settings
- Chapter 12 RAID
- Chapter 13 HDD Management
- Chapter 14 Camera Settings
- Chapter 15 DVR Management and Maintenance
- Chapter 16 Others
- Chapter 17 Appendix

ATM Digital Video Recorder User Manual
198
Figure 14-5 Image Settings Interface (IP Camera)
Step 3 Select the camera to set image parameters.
Step 4 Two periods for different image settings are provided, select the period name in the
drop-down list.
The time periods cannot be overlapped with each other.
Step 5 Select the mode from the drop-down list of Mode.
There are four modes selectable for the analog cameras: Standard, Indoor, Dim Light and
Outdoor.
Step 6 Adjust the image parameters according to actual needs.
The parameters include Brightness, Contrast, Saturation, Hue, Sharpness and Denoising for
the analog cameras and Brightness, Contrast and Saturation for the IP cameras. You can
also click Restore to set the parameters to the default settings.
Step 7 (Optional) Click Copy to copy the image settings of the current camera to other cameras.
Step 8 Click Apply to save the settings.
14.3.2 Configuring Camera Parameters Settings
Step 1 Enter the Image Settings interface.
Menu > Camera > Image
Step 2 Select the Camera Parameters Settings tab.