
Quick Start Guide


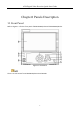

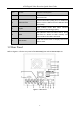

Table Of Contents
- Chapter1 Panels Description
- Chapter 2 Installation and Connections
- Chapter 3 Menu Operation
- 3.1 Menu Structure
- 3.2 Startup and Shutdown
- 3.3 Activating Your Device
- 3.4 Using the Unlock Pattern for Login
- 3.5 Login and Logout
- 3.6 Using the Setup Wizard
- 3.7 Configuring Signal Input Channel
- 3.8 Network Settings
- 3.9 General Settings
- 3.10 Adding IP Cameras
- 3.11 Configuring Custom Protocols
- 3.12 Live View
- 3.13 ATM Settings
- 3.14 Smart ATM Settings
- 3.15 Recording Settings
- 3.16 Playback
- Chapter 4 Accessing by Web Browser

ATM Digital Video Recorder Quick Start Guide
7
Table 1-1 Description of Front Panel
No.
Name
Function Description
1
DIRECTION
The DIRECTION buttons are used to navigate
between different fields and items in menus.
In the Playback mode, the Up and Down button
is used to speed up and slow down recorded
video. The Left and Right button will select the
next and previous record files.
In Live View mode, these buttons can be used
to cycle through channels.
In PTZ control mode, it can control the
movement of the PTZ camera.
ENTER
The button is used to confirm selection in
any of the menu modes.
It can also be used to tick checkbox fields.
In Playback mode, it can be used to play or
pause the video.
In single-frame Playback mode, pressing the
button will advance the video by a single
frame.
In Auto-switch mode, it can be used to stop
/start auto switch.
2
MENU
Access the main menu interface.
Switch the channels in PTZ control.
Select/deselect the HDD in HDD management
interface.
3
ESC
Exit from the current interface.
Enter the PTZ control interface in live view
mode.
4
IR Receiver
Receiver for IR remote control.
5
POWER
(Power indicator)
Turn on/off the device.
Power indicator stays red when the device is
powered on but is not turned on.
Power indicator turns pink when the device is
being turned on.