
Quick Start Guide


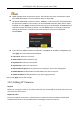


Table Of Contents
- Chapter1 Panels Description
- Chapter 2 Installation and Connections
- Chapter 3 Menu Operation
- 3.1 Menu Structure
- 3.2 Startup and Shutdown
- 3.3 Activating Your Device
- 3.4 Using the Unlock Pattern for Login
- 3.5 Login and Logout
- 3.6 Using the Setup Wizard
- 3.7 Configuring Signal Input Channel
- 3.8 Network Settings
- 3.9 General Settings
- 3.10 Adding IP Cameras
- 3.11 Configuring Custom Protocols
- 3.12 Live View
- 3.13 ATM Settings
- 3.14 Smart ATM Settings
- 3.15 Recording Settings
- 3.16 Playback
- Chapter 4 Accessing by Web Browser

ATM Digital Video Recorder Quick Start Guide
25
Step 2 Select the General tab.
Step 3 In the General Settings interface, you can configure the following settings: Working Mode,
NIC Type, IPv4 Address, IPv4 Gateway, MTU and DNS Server.
Step 4 If the DHCP server is available, you can check the checkbox of Enable DHCP to automatically
obtain an IP address and other network settings from that server.
Step 5 If DHCP is enabled, you can check the checkbox of Enable DNS DHCP or uncheck it and edit
the Preferred DNS Server and Alternate DNS Server.
Step 6 Click Apply to save the settings.
3.9 General Settings
Purpose
You can configure the output resolution, system time, mouse pointer speed, etc.
Step 1 Enter the General Settings interface.
Menu > Configuration > General
Step 2 Select the General tab.
Figure 3-21 General Settings Interface
Step 3 Configure the following settings.
Language: The default language is English.
Output Standard: Select the output standard to be PAL or NTSC.
VGA/HDMI Resolution: Select the output resolution, which must be the same with the
resolution of the VGA/HDMI display.