
Quick Start Guide


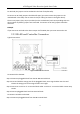
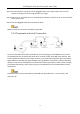


Table Of Contents
- Chapter1 Panels Description
- Chapter 2 Installation and Connections
- Chapter 3 Menu Operation
- 3.1 Menu Structure
- 3.2 Startup and Shutdown
- 3.3 Activating Your Device
- 3.4 Using the Unlock Pattern for Login
- 3.5 Login and Logout
- 3.6 Using the Setup Wizard
- 3.7 Configuring Signal Input Channel
- 3.8 Network Settings
- 3.9 General Settings
- 3.10 Adding IP Cameras
- 3.11 Configuring Custom Protocols
- 3.12 Live View
- 3.13 ATM Settings
- 3.14 Smart ATM Settings
- 3.15 Recording Settings
- 3.16 Playback
- Chapter 4 Accessing by Web Browser

ATM Digital Video Recorder Quick Start Guide
10
Chapter 2 Installation and Connections
2.1 DVR Installation
During installation of the DVR:
Use brackets for rack mounting.
Ensure ample room for audio and video cables.
When routing cables, ensure that the bend radius of the cables are no less than five times than
its diameter.
Connect the alarm cable.
Allow at least 2cm (≈0.75-inch) of space between racks mounted devices.
Ensure the DVR is grounded.
Environmental temperature should be within the range of -10 to +55º C, +14 to +131º F.
Environmental humidity should be within the range of 10% to 90%.
2.2 Hard Disk Installation
Before you start
Before installing a hard disk drive (HDD), please make sure the power is disconnected from the
DVR. A factory recommended HDD should be used for this installation.
Four SATA hard disks can be installed.
Tools Required: Screwdriver.
Step 1 Remove the cover from the DVR by unfastening the 6 screws on the back and side.
Step 2 Unfasten the 2 screws on the HDD bracket.
Figure 2-1 Unfasten the Screw
Step 3 Take the bracket from the chassis and install the HDD.