
User Manual
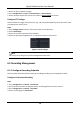
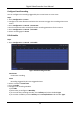
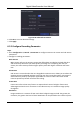
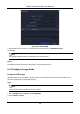
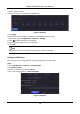
Table Of Contents
- Chapter 1 Startup
- Chapter 2 Live View
- Chapter 3 Playback
- Chapter 4 File Search
- Chapter 5 Configuration (Easy Mode)
- Chapter 6 Configuration (Expert Mode)
- 6.1 System Configuration
- 6.2 Network Configuration
- 6.3 Camera Management
- 6.4 Event Configuration
- 6.5 Recording Management
- 6.6 RS-232 Settings
- 6.7 Face Picture Library Management
- Chapter 7 Maintenance
- Chapter 8 Alarm
- Chapter 9 Web Operation
- Chapter 10 Appendix

Digital Video Recorder User Manual
74
columns (width) by the number of pixel-rows (height), for example, 1024 × 768.
Bitrate
The bit rate (in Kbit/s or Mbit/s) is often referred to as speed, but actually defines the number
of bits/time unit and not distance/time unit.
Enable H.264+/Enable H.265+
The H.264+/H.265+ mode helps to ensure the high video quality with a lowered bitrate. It
can effectively reduce the need of bandwidth and HDD storage space.
3. Click Apply.
6.5.3 Storage Device
Initialize HDD
If it is the first time you use your HDD, please initialize it after it is installed.
Before You Start
Install at least an HDD to your video recorder.
Steps
1. Go to Configuration → Record → Storage.
2. Select an HDD.
3. Click Init.
Add Network Disk
You can add the allocated NAS or IP SAN disk to the video recorder, and use it as a network HDD.
Steps
1. Go to Configuration → Record → Storage.
2. Click Add.
3. Set NetHDD.
4. Set Type as NAS or IPSAN.
5. Enter NetHDD IP address.
6. Click to search the available disks.