
User Manual
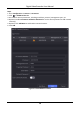
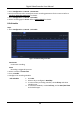
Table Of Contents
- Chapter 1 Startup
- Chapter 2 Live View
- Chapter 3 Playback
- Chapter 4 File Search
- Chapter 5 Configuration (Easy Mode)
- Chapter 6 Configuration (Expert Mode)
- 6.1 System Configuration
- 6.2 Network Configuration
- 6.3 Camera Management
- 6.4 Event Configuration
- 6.5 Recording Management
- 6.6 RS-232 Settings
- 6.7 Face Picture Library Management
- Chapter 7 Maintenance
- Chapter 8 Alarm
- Chapter 9 Web Operation
- Chapter 10 Appendix

Digital Video Recorder User Manual
34
3. Go to Configuration → Record → Parameter.
4. Set the continuous main stream/sub-stream recording parameters for the camera. Refer to
Configure Recording Parameter for details.
5. Go to Configuration → Record → Schedule.
6. Select recording type as Event. Refer to Edit Schedule for details.
Edit Schedule
Steps
1. Go to Configuration → Record → Schedule.
Figure 5-14 Recording Schedule
Continuous
Continuous recording.
Event
Recording is triggered by events.
2. Select a camera in Camera No.
3. Turn on Enable.
4. Configure the recording schedule.
Edit Schedule
1. Click Edit.
2. Select a day to configure in Weekday.
3. To set an all-day recording schedule, check All Day and select
schedule type.
4. To set other schedules, uncheck All Day, and set Start/End Time
and schedule type.