
User Manual
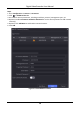
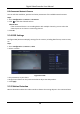
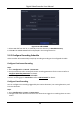
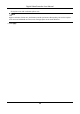
Table Of Contents
- Chapter 1 Startup
- Chapter 2 Live View
- Chapter 3 Playback
- Chapter 4 File Search
- Chapter 5 Configuration (Easy Mode)
- Chapter 6 Configuration (Expert Mode)
- 6.1 System Configuration
- 6.2 Network Configuration
- 6.3 Camera Management
- 6.4 Event Configuration
- 6.5 Recording Management
- 6.6 RS-232 Settings
- 6.7 Face Picture Library Management
- Chapter 7 Maintenance
- Chapter 8 Alarm
- Chapter 9 Web Operation
- Chapter 10 Appendix

Digital Video Recorder User Manual
27
Note
The maximum connectable AT/AF camera number varies with different models.
5.3.3 Network Camera
Add Network Camera by Device Password
Add network cameras which the password is the same as your video recorder.
Before You Start
● Ensure your network camera is on the same network segment with your video recorder.
● Ensure the network connection is valid and correct. Refer to General for details.
● Ensure the network camera password is the same as your video recorder.
Steps
1. Go to Configuration → Camera → IP Camera. The online cameras on the same network
segment with your video recorder are displayed in Online Device List.
Figure 5-9 IP Camera Management Interface
2. Select a desired network camera.
3. Click to add the camera.
Note
If the camera is inactive, the device will activate it automatically with the password you have set
during device activation.
Add Network Camera Manually
Before You Start
● Ensure your network camera is on the same network segment with that of your video recorder.
● Ensure the network connection is valid and correct.
● Ensure the network camera is activated.