
User Manual


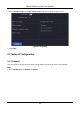
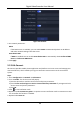
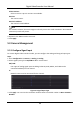
Table Of Contents
- Chapter 1 Startup
- Chapter 2 Live View
- Chapter 3 Playback
- Chapter 4 File Search
- Chapter 5 Configuration (Easy Mode)
- Chapter 6 Configuration (Expert Mode)
- 6.1 System Configuration
- 6.2 Network Configuration
- 6.3 Camera Management
- 6.4 Event Configuration
- 6.5 Recording Management
- 6.6 RS-232 Settings
- 6.7 Face Picture Library Management
- Chapter 7 Maintenance
- Chapter 8 Alarm
- Chapter 9 Web Operation
- Chapter 10 Appendix

Digital Video Recorder User Manual
22
Figure 5-4 Network
2. Set network parameters.
DHCP
If the DHCP server is available, you can enable DHCP to automatically obtain an IP address
and other network settings from that server.
Auto Obtain DNS
If DHCP is enabled. You can enable Auto Obtain DNS to automatically obtain Preferred DNS
Server and Alternate DNS Server.
3. Click Apply.
5.2.2 Hik-Connect
Hik-Connect provides mobile phone application and platform service to access and manage your
connected devices, which enables you to get a convenient remote access to the surveillance
system.
Steps
1. Go to Configuration → Network → Hik-Connect.
2. Turn on Enable. The service terms will pop up.
1) Scan the QR code to read the service terms and privacy statement.
2) Check I have read and agree to Service Terms and Privacy Statement. if you agree with the
service terms and privacy statement..
3) Click OK.
3. Click to set verification code.
4. Optional: Enable Stream Encryption. It requires to enter verification code in remote access and
live view after this function is enabled.
5. Optional: Edit Server IP.