
User Manual

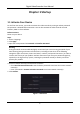
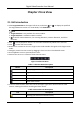
Table Of Contents
- Chapter 1 Startup
- Chapter 2 Live View
- Chapter 3 Playback
- Chapter 4 File Search
- Chapter 5 Configuration (Easy Mode)
- Chapter 6 Configuration (Expert Mode)
- 6.1 System Configuration
- 6.2 Network Configuration
- 6.3 Camera Management
- 6.4 Event Configuration
- 6.5 Recording Management
- 6.6 RS-232 Settings
- 6.7 Face Picture Library Management
- Chapter 7 Maintenance
- Chapter 8 Alarm
- Chapter 9 Web Operation
- Chapter 10 Appendix

Digital Video Recorder User Manual
5
Chapter 2 Live View
2.1 GUI Introduction
● Click Target Detection at the upper-left corner, and select or to display the specified
live target detection results. For result details, click View More.
Note
○ Target Detection is only available for certain models.
○ Target Detection is valid when HDD is installed.
○ is valid for motion detection, line crossing detection, intrusion detection, and facial
detection.
● Click to start/stop auto-switch. The screen will automatically switch to the next one.
● Click to enter full screen mode.
● Double click a camera to view it in single-screen mode. Double click again to exit single-screen
mode.
● Change a camera live view screen by dragging it from its screen to the desired screen.
● Scroll up/down to turn to previous/next screen.
● Position the cursor on a camera to show shortcut menu.
Figure 2-1 Shortcut Menu
Table 2-1 Shortcut Menu Description
Button
Description
Start playing videos recorded in the latest five minutes.
Digital zoom. You can adjust zoom-in times and view the desired area.
Click it to enter PTZ control mode.
Turn on/off live view audio.
Switch video stream.
● In the live view interface, there are icons at the upper-right corner of the screen for each
camera, showing the camera recording and alarm status.
Table 2-2 Live View Icon Description
Icon
Description
Alarming (normal event and smart event).