
User Manual


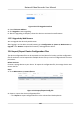
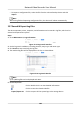
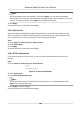


Table Of Contents
- Legal Information
- Regulatory Information
- Applicable Model
- Symbol Conventions
- Safety Instruction
- Preventive and Cautionary Tips
- Chapter 1 Basic Operation
- Chapter 2 Camera Settings
- Chapter 3 Live View
- Chapter 4 Recording and Playback
- 4.1 Recording
- 4.1.1 Configure Recording Parameters
- 4.1.2 Enable the H.265 Stream Access
- 4.1.3 ANR
- 4.1.4 Manual Recording
- 4.1.5 Configure Plan Recording
- 4.1.6 Configure Continuous Recording
- 4.1.7 Configure Motion Detection Triggered Recording
- 4.1.8 Configure Event Triggered Recording
- 4.1.9 Configure Alarm Triggered Recording
- 4.1.10 Configure Picture Capture
- 4.1.11 Configure Holiday Recording
- 4.1.12 Configure Redundant Recording and Capture
- 4.2 Playback
- 4.3 Playback Operations
- 4.1 Recording
- Chapter 5 Event
- 5.1 Normal Event Alarm
- 5.2 VCA Event Alarm
- 5.2.1 Facial Detection
- 5.2.2 Configure Vehicle Detection
- 5.2.3 Loitering Detection
- 5.2.4 People Gathering Detection
- 5.2.5 Fast Moving Detection
- 5.2.6 Parking Detection
- 5.2.7 Unattended Baggage Detection
- 5.2.8 Object Removal Detection
- 5.2.9 Audio Exception Detection
- 5.2.10 Defocus Detection
- 5.2.11 Sudden Scene Change Detection
- 5.2.12 PIR Alarm
- 5.2.13 Thermal Camera Detection
- 5.2.14 Configure Queue Management
- 5.3 Configure Arming Schedule
- 5.4 Configure Linkage Actions
- Chapter 6 Smart Analysis
- Chapter 7 File Management
- Chapter 8 POS Configuration
- Chapter 9 Storage
- Chapter 10 Hot Spare Recorder Backup
- Chapter 11 Network Settings
- Chapter 12 User Management and Security
- Chapter 13 System Management
- Chapter 14 Appendix
- 14.1 Glossary
- 14.2 Frequently Asked Questions
- 14.2.1 Why is there a part of channels displaying “No Resource” or turning black screen in multi-screen of live view?
- 14.2.2 Why is the video recorder notifying not support the stream type?
- 14.2.3 Why is the video recorder notifying risky password after adding network camera?
- 14.2.4 How to improve the playback image quality?
- 14.2.5 How to confirm the video recorder is using H.265 to record video?
- 14.2.6 Why is the timeline at playback not constant?
- 14.2.7 When adding network camera, the video recorder notifies network is unreachable.
- 14.2.8 Why is the IP address of network camera being changed automatically?
- 14.2.9 Why is the video recorder notifying IP conflict?
- 14.2.10 Why is image getting stuck when the video recorder is playing back by single or multi-channel cameras?
- 14.2.11 Why does my video recorder make a beeping sound after booting?
- 14.2.12 Why is there no recorded video after setting the motion detection?
- 14.2.13 Why is the sound quality not good in recording video?

Note
• You can pause/resume or cancel the
detecon.
• Aer tesng has been completed, you can click Error informaon to see the detailed damage
informaon.
13.4.2 S.M.A.R.T. Detecon
HDD detecon funcons such as the adopng of the S.M.A.R.T. and the Bad Sector Detecon
techniques. S.M.A.R.T. (Self-Monitoring, Analysis and Reporng Technology) are HDD monitoring
systems to detect various reliability indicators in the hopes of ancipang failures.
Steps
1. Go to Maintenance → HDD
Operaon → Bad Sector Detecon .
2. Select the HDD to view its S.M.A.R.T. informaon list.
3. Select the self-test types as Short Test, Expanded Test, or the Conveyance Test.
4. Click Self-Test to start the S.M.A.R.T. HDD
self-evaluaon.
Figure 13-6 S.M.A.R.T. Sengs Interface
Note
To use the HDD even when the S.M.A.R.T. checking has failed, check Connue to use the disk
when self-evaluaon is failed.
The related informaon of the S.M.A.R.T. is shown, and you can check the HDD status.
Network Video Recorder User Manual
143