
User Manual


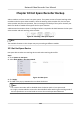


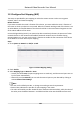
Table Of Contents
- Legal Information
- Regulatory Information
- Applicable Model
- Symbol Conventions
- Safety Instruction
- Preventive and Cautionary Tips
- Chapter 1 Basic Operation
- Chapter 2 Camera Settings
- Chapter 3 Live View
- Chapter 4 Recording and Playback
- 4.1 Recording
- 4.1.1 Configure Recording Parameters
- 4.1.2 Enable the H.265 Stream Access
- 4.1.3 ANR
- 4.1.4 Manual Recording
- 4.1.5 Configure Plan Recording
- 4.1.6 Configure Continuous Recording
- 4.1.7 Configure Motion Detection Triggered Recording
- 4.1.8 Configure Event Triggered Recording
- 4.1.9 Configure Alarm Triggered Recording
- 4.1.10 Configure Picture Capture
- 4.1.11 Configure Holiday Recording
- 4.1.12 Configure Redundant Recording and Capture
- 4.2 Playback
- 4.3 Playback Operations
- 4.1 Recording
- Chapter 5 Event
- 5.1 Normal Event Alarm
- 5.2 VCA Event Alarm
- 5.2.1 Facial Detection
- 5.2.2 Configure Vehicle Detection
- 5.2.3 Loitering Detection
- 5.2.4 People Gathering Detection
- 5.2.5 Fast Moving Detection
- 5.2.6 Parking Detection
- 5.2.7 Unattended Baggage Detection
- 5.2.8 Object Removal Detection
- 5.2.9 Audio Exception Detection
- 5.2.10 Defocus Detection
- 5.2.11 Sudden Scene Change Detection
- 5.2.12 PIR Alarm
- 5.2.13 Thermal Camera Detection
- 5.2.14 Configure Queue Management
- 5.3 Configure Arming Schedule
- 5.4 Configure Linkage Actions
- Chapter 6 Smart Analysis
- Chapter 7 File Management
- Chapter 8 POS Configuration
- Chapter 9 Storage
- Chapter 10 Hot Spare Recorder Backup
- Chapter 11 Network Settings
- Chapter 12 User Management and Security
- Chapter 13 System Management
- Chapter 14 Appendix
- 14.1 Glossary
- 14.2 Frequently Asked Questions
- 14.2.1 Why is there a part of channels displaying “No Resource” or turning black screen in multi-screen of live view?
- 14.2.2 Why is the video recorder notifying not support the stream type?
- 14.2.3 Why is the video recorder notifying risky password after adding network camera?
- 14.2.4 How to improve the playback image quality?
- 14.2.5 How to confirm the video recorder is using H.265 to record video?
- 14.2.6 Why is the timeline at playback not constant?
- 14.2.7 When adding network camera, the video recorder notifies network is unreachable.
- 14.2.8 Why is the IP address of network camera being changed automatically?
- 14.2.9 Why is the video recorder notifying IP conflict?
- 14.2.10 Why is image getting stuck when the video recorder is playing back by single or multi-channel cameras?
- 14.2.11 Why does my video recorder make a beeping sound after booting?
- 14.2.12 Why is there no recorded video after setting the motion detection?
- 14.2.13 Why is the sound quality not good in recording video?

RAID Level The Required Number of HDDs
RAID 5 At least 3 HDDs.
RAID 6 At least 4 HDDs.
RAID 10 The number of HDD must be an even ranges from 4 to 16.
9.
Click OK.
10.
Oponal: The video recorder will automacally inialize the created array. Go to Storage →
RAID Setup → Array to view the informaon of the created array.
Figure 9-7 Array List
9.2.2 Rebuild an Array
The array status includes Funconal, Degraded, and Oine. To ensure the high security and
reliability of the data stored in an array, take immediate and proper maintenance of the arrays
according its status.
Funconal
No disk loss in the array.
Oine
The number of lost disks has exceeded the limit.
Degraded
If any HDD fails in the array, the array degrades. Restore it to Funconal status by rebuilding the
array.
Congure
a Hot Spare Disk
The hot spare disk is required for the disk array automac rebuilding.
Steps
1. Go to Storage → RAID Setup → Physical Disk .
Figure 9-8 Physical Disk
Network Video Recorder User Manual
115