
User Manual


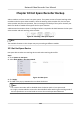


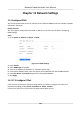
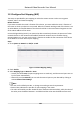
Table Of Contents
- Legal Information
- Regulatory Information
- Applicable Model
- Symbol Conventions
- Safety Instruction
- Preventive and Cautionary Tips
- Chapter 1 Basic Operation
- Chapter 2 Camera Settings
- Chapter 3 Live View
- Chapter 4 Recording and Playback
- 4.1 Recording
- 4.1.1 Configure Recording Parameters
- 4.1.2 Enable the H.265 Stream Access
- 4.1.3 ANR
- 4.1.4 Manual Recording
- 4.1.5 Configure Plan Recording
- 4.1.6 Configure Continuous Recording
- 4.1.7 Configure Motion Detection Triggered Recording
- 4.1.8 Configure Event Triggered Recording
- 4.1.9 Configure Alarm Triggered Recording
- 4.1.10 Configure Picture Capture
- 4.1.11 Configure Holiday Recording
- 4.1.12 Configure Redundant Recording and Capture
- 4.2 Playback
- 4.3 Playback Operations
- 4.1 Recording
- Chapter 5 Event
- 5.1 Normal Event Alarm
- 5.2 VCA Event Alarm
- 5.2.1 Facial Detection
- 5.2.2 Configure Vehicle Detection
- 5.2.3 Loitering Detection
- 5.2.4 People Gathering Detection
- 5.2.5 Fast Moving Detection
- 5.2.6 Parking Detection
- 5.2.7 Unattended Baggage Detection
- 5.2.8 Object Removal Detection
- 5.2.9 Audio Exception Detection
- 5.2.10 Defocus Detection
- 5.2.11 Sudden Scene Change Detection
- 5.2.12 PIR Alarm
- 5.2.13 Thermal Camera Detection
- 5.2.14 Configure Queue Management
- 5.3 Configure Arming Schedule
- 5.4 Configure Linkage Actions
- Chapter 6 Smart Analysis
- Chapter 7 File Management
- Chapter 8 POS Configuration
- Chapter 9 Storage
- Chapter 10 Hot Spare Recorder Backup
- Chapter 11 Network Settings
- Chapter 12 User Management and Security
- Chapter 13 System Management
- Chapter 14 Appendix
- 14.1 Glossary
- 14.2 Frequently Asked Questions
- 14.2.1 Why is there a part of channels displaying “No Resource” or turning black screen in multi-screen of live view?
- 14.2.2 Why is the video recorder notifying not support the stream type?
- 14.2.3 Why is the video recorder notifying risky password after adding network camera?
- 14.2.4 How to improve the playback image quality?
- 14.2.5 How to confirm the video recorder is using H.265 to record video?
- 14.2.6 Why is the timeline at playback not constant?
- 14.2.7 When adding network camera, the video recorder notifies network is unreachable.
- 14.2.8 Why is the IP address of network camera being changed automatically?
- 14.2.9 Why is the video recorder notifying IP conflict?
- 14.2.10 Why is image getting stuck when the video recorder is playing back by single or multi-channel cameras?
- 14.2.11 Why does my video recorder make a beeping sound after booting?
- 14.2.12 Why is there no recorded video after setting the motion detection?
- 14.2.13 Why is the sound quality not good in recording video?

Figure 9-5 Congure eSATA for Auto Backup
9.2 Disk Array
A disk array is a data storage virtualizaon technology that combines mulple physical disk drives
into a single logical unit. Also known as a "RAID", an array stores data over mulple HDDs to
provide enough redundancy so that data can be recovered if one disk fails. Data is distributed
across the drives in one of several ways called "RAID levels", based the redundancy and
performance required.
9.2.1 Create a Disk Array
The video recorder supports soware-based disk arrays. Enable the RAID funcon as required. Two
ways are available for
creang an array: one-touch conguraon and manual conguraon.
One-Touch
Creaon
One-touch conguraon creates the disk array. By default, the array type created by one-touch
conguraon is RAID 5.
Before You Start
Install at least 3 HDDs. If more than 10 HDDs are installed, 2 arrays will be created. To maintain
reliability and stability running of the HDDs, it is recommended to use of enterprise-level HDDs of
the same model and capacity.
Steps
1. Go to Storage → Advanced .
2. Check Enable RAID.
3. Click Apply and reboot the device to have
sengs take eect.
Network Video Recorder User Manual
113