
User Manual
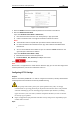
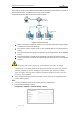
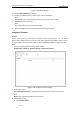
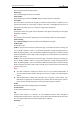
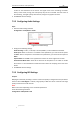
Table Of Contents
- Chapter 1 Overview
- Chapter 2 Network Connection
- Chapter 3 Accessing to the Network Speed Dome
- Chapter 4 Basic Operations
- Chapter 5 ITS Configuration
- 5.1 Set Enforcement
- 5.2 Set Vehicle Detection
- 5.3 Set Basic Configuration
- 5.4 Set Advanced Parameters
- 5.5 Pictures
- 5.6 Set FTP Host
- 5.7 Set Blocklist & Allowlist
- Chapter 6 Speed Dome Configuration
- 6.1 Storage Settings
- 6.2 Basic Event Configuration
- 6.3 Smart Event Configuration
- 6.4 PTZ Configuration
- 6.4.1 Configuring Basic PTZ Parameters
- 6.4.2 Configuring PTZ Limits
- 6.4.3 Configuring Initial Position
- 6.4.4 Configuring Park Actions
- 6.4.5 Configuring Privacy Mask
- 6.4.6 Configuring Scheduled Tasks
- 6.4.7 Clearing PTZ Configurations
- 6.4.8 Prioritize PTZ
- 6.4.9 Configuring Position Settings
- 6.4.10 Configuring Rapid Focus
- Chapter 7 System Configuration
- 7.1 Configuring Network Settings
- 7.2 Configuring Video and Audio Settings
- 7.3 Configuring Image Settings
- 7.4 Configuring System Settings
- Appendix

User Manual of Network Traffic Speed Dome
© Hikvision
86
When devices connect to this network with IEEE 802.1X standard, the authentication is needed. If
the authentication fails, the devices don’t connect to the network.
The protected LAN with 802.1X standard is shown as follows:
Speed Dome
PC
Network Switch
Internet
PC
RADIUS Server
Authenticator
Authentication
Server
Figure 7-18 Protected LAN
Before connecting the Network Camera to the protected LAN, please apply a digital
certificate from a Certificate Authority.
The network camera requests access to the protected LAN via the authenticator (a
switch).
The switch forwards the identity and password to the authentication server (RADIUS
server).
The switch forwards the certificate of authentication server to the network camera.
If all the information is validated, the switch allows the network access to the protected
network.
For your privacy and to better protect your system against security risks, we strongly
recommend the use of strong passwords for all functions and network devices. The password
should be something of your own choosing (using a minimum of 8 characters, including
upper case letters, lower case letters, numbers and special characters) in order to increase
the security of your product.
Proper configuration of all passwords and other security settings is the responsibility of the
installer and/or end-user.
Steps:
1. Connect the network camera to your PC directly with a network cable.
2. Enter the 802.1X settings interface:
Configuration > Network > Advanced Settings > 802.1X