
User Manual
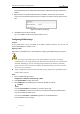

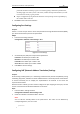
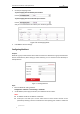
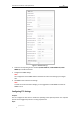

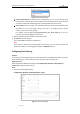
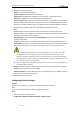
Table Of Contents
- Chapter 1 Overview
- Chapter 2 Network Connection
- Chapter 3 Accessing to the Network Speed Dome
- Chapter 4 Basic Operations
- Chapter 5 ITS Configuration
- 5.1 Set Enforcement
- 5.2 Set Vehicle Detection
- 5.3 Set Basic Configuration
- 5.4 Set Advanced Parameters
- 5.5 Pictures
- 5.6 Set FTP Host
- 5.7 Set Blocklist & Allowlist
- Chapter 6 Speed Dome Configuration
- 6.1 Storage Settings
- 6.2 Basic Event Configuration
- 6.3 Smart Event Configuration
- 6.4 PTZ Configuration
- 6.4.1 Configuring Basic PTZ Parameters
- 6.4.2 Configuring PTZ Limits
- 6.4.3 Configuring Initial Position
- 6.4.4 Configuring Park Actions
- 6.4.5 Configuring Privacy Mask
- 6.4.6 Configuring Scheduled Tasks
- 6.4.7 Clearing PTZ Configurations
- 6.4.8 Prioritize PTZ
- 6.4.9 Configuring Position Settings
- 6.4.10 Configuring Rapid Focus
- Chapter 7 System Configuration
- 7.1 Configuring Network Settings
- 7.2 Configuring Video and Audio Settings
- 7.3 Configuring Image Settings
- 7.4 Configuring System Settings
- Appendix

User Manual of Network Traffic Speed Dome
© Hikvision
81
Figure 7-11 Child Directory
Picture Filing Interval: For better picture management, you can set the picture filling
interval from 1 day to 30 days. Pictures captured in the same time interval will be saved in
one folder named after the beginning date and ending date of the time interval.
Picture name: Set the naming rule for captured picture files. You can choose Default in the
drop-down list to use the default naming rule, that is, "IP address_camera channel
number_capture time_event type.jpg".
For example, 10.11.37.189_01_20150917094425492_FACE_DETECTION.jpg. Or you can
customize the name by adding a Custom Prefix.
3. Check the Upload Picture checkbox to enable the function.
4. Click Save to save the settings.
You can click Test to confirm the configuration.
Note:
If you want to upload the captured pictures to FTP server, you also have to enable the
continuous snapshot or event-triggered snapshot in Snapshot interface.
Configuring Email Settings
Purpose:
The system can be configured to send an Email notification to all designated receivers if an alarm
event is detected, e.g., motion detection event, video loss, video-tampering, etc.
Before you start:
Please configure the DNS Server settings under Configuration> Network > Basic Settings >
TCP/IP before using the Email function.
Steps:
1. Enter the Email settings interface:
Configuration> Network > Advanced Settings > Email
Figure 7-12 Email Settings