
User Manual

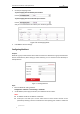

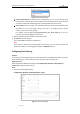
Table Of Contents
- Chapter 1 Overview
- Chapter 2 Network Connection
- Chapter 3 Accessing to the Network Speed Dome
- Chapter 4 Basic Operations
- Chapter 5 ITS Configuration
- 5.1 Set Enforcement
- 5.2 Set Vehicle Detection
- 5.3 Set Basic Configuration
- 5.4 Set Advanced Parameters
- 5.5 Pictures
- 5.6 Set FTP Host
- 5.7 Set Blocklist & Allowlist
- Chapter 6 Speed Dome Configuration
- 6.1 Storage Settings
- 6.2 Basic Event Configuration
- 6.3 Smart Event Configuration
- 6.4 PTZ Configuration
- 6.4.1 Configuring Basic PTZ Parameters
- 6.4.2 Configuring PTZ Limits
- 6.4.3 Configuring Initial Position
- 6.4.4 Configuring Park Actions
- 6.4.5 Configuring Privacy Mask
- 6.4.6 Configuring Scheduled Tasks
- 6.4.7 Clearing PTZ Configurations
- 6.4.8 Prioritize PTZ
- 6.4.9 Configuring Position Settings
- 6.4.10 Configuring Rapid Focus
- Chapter 7 System Configuration
- 7.1 Configuring Network Settings
- 7.2 Configuring Video and Audio Settings
- 7.3 Configuring Image Settings
- 7.4 Configuring System Settings
- Appendix

User Manual of Network Traffic Speed Dome
© Hikvision
76
password should be something of your own choosing (using a minimum of 8 characters,
including upper case letters, lower case letters, numbers and special characters) in order
to increase the security of your product.
Proper configuration of all passwords and other security settings is the responsibility of
the installer and/or end-user.
4. Click Save to save and exit the interface.
Configuring Port Settings
Purpose:
If there is a router and you want to access the speed dome through Wide Area Network (WAN),
you need to forward the 3 ports for the speed dome.
Steps:
1. Enter the Port settings interface:
Configuration > Network > Basic Settings > Port
Figure 7-5 Port Settings
2. Set the HTTP port, RTSP port and port of the speed dome.
HTTP Port: The default port number is 80.
RTSP Port: The default port number is 554.
HTTPS Port: The default port number is 443.
Server Port: The default port number is 8000.
3. Click Save to save the settings.
Configuring NAT (Network Address Translation) Settings
Purpose:
Universal Plug and Play (UPnP™) is a networking architecture that provides compatibility among
networking equipment, software and other hardware devices. The UPnP protocol allows devices
to connect seamlessly and to simplify the implementation of networks in the house and
corporate environments.
With the function enabled, you don’t need to configure the port mapping for each port, and the
camera is connected to the Wide Area Network via the router.
Steps:
1. Enter the UPnP™ settings interface:
Configuration >Network > Basic Settings > NAT
2. Check the checkbox to enable the UPnP™ function.
Note:
You can edit the Friendly Name of the speed dome. This name can be detected by
corresponding device, such as a router.