
User Manual
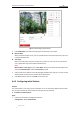
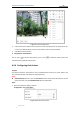
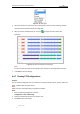
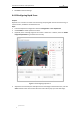
Table Of Contents
- Chapter 1 Overview
- Chapter 2 Network Connection
- Chapter 3 Accessing to the Network Speed Dome
- Chapter 4 Basic Operations
- Chapter 5 ITS Configuration
- 5.1 Set Enforcement
- 5.2 Set Vehicle Detection
- 5.3 Set Basic Configuration
- 5.4 Set Advanced Parameters
- 5.5 Pictures
- 5.6 Set FTP Host
- 5.7 Set Blocklist & Allowlist
- Chapter 6 Speed Dome Configuration
- 6.1 Storage Settings
- 6.2 Basic Event Configuration
- 6.3 Smart Event Configuration
- 6.4 PTZ Configuration
- 6.4.1 Configuring Basic PTZ Parameters
- 6.4.2 Configuring PTZ Limits
- 6.4.3 Configuring Initial Position
- 6.4.4 Configuring Park Actions
- 6.4.5 Configuring Privacy Mask
- 6.4.6 Configuring Scheduled Tasks
- 6.4.7 Clearing PTZ Configurations
- 6.4.8 Prioritize PTZ
- 6.4.9 Configuring Position Settings
- 6.4.10 Configuring Rapid Focus
- Chapter 7 System Configuration
- 7.1 Configuring Network Settings
- 7.2 Configuring Video and Audio Settings
- 7.3 Configuring Image Settings
- 7.4 Configuring System Settings
- Appendix

User Manual of Network Traffic Speed Dome
© Hikvision
71
5. Click Save to save the settings.
6.4.10 Configuring Rapid Focus
Purpose:
Rapid focus is a function to reduce time of focusing comparing with that of normal focusing. To
use the function, calibration should be done first.
Steps:
1. Enter the Rapid Focus configuration interface: Configuration > PTZ > Rapid Focus
2. Check Enable to enable rapid focus function.
3. (Optional) If the mounting height of the camera is lower than 3 meters, check the Enable
Height Compensation to guarantee focus accuracy.
Figure 6-34 Configuring Rapid Focus
4. Adjust PTZ in PTZ control panel and adjust the live view image to the desired scene, and click
Add to add the scene. Click to select the scene and a red line pops up in live view image.