
User Manual
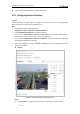
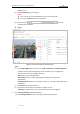
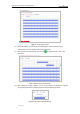
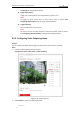
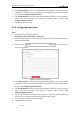


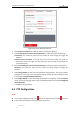
Table Of Contents
- Chapter 1 Overview
- Chapter 2 Network Connection
- Chapter 3 Accessing to the Network Speed Dome
- Chapter 4 Basic Operations
- Chapter 5 ITS Configuration
- 5.1 Set Enforcement
- 5.2 Set Vehicle Detection
- 5.3 Set Basic Configuration
- 5.4 Set Advanced Parameters
- 5.5 Pictures
- 5.6 Set FTP Host
- 5.7 Set Blocklist & Allowlist
- Chapter 6 Speed Dome Configuration
- 6.1 Storage Settings
- 6.2 Basic Event Configuration
- 6.3 Smart Event Configuration
- 6.4 PTZ Configuration
- 6.4.1 Configuring Basic PTZ Parameters
- 6.4.2 Configuring PTZ Limits
- 6.4.3 Configuring Initial Position
- 6.4.4 Configuring Park Actions
- 6.4.5 Configuring Privacy Mask
- 6.4.6 Configuring Scheduled Tasks
- 6.4.7 Clearing PTZ Configurations
- 6.4.8 Prioritize PTZ
- 6.4.9 Configuring Position Settings
- 6.4.10 Configuring Rapid Focus
- Chapter 7 System Configuration
- 7.1 Configuring Network Settings
- 7.2 Configuring Video and Audio Settings
- 7.3 Configuring Image Settings
- 7.4 Configuring System Settings
- Appendix

User Manual of Network Traffic Speed Dome
© Hikvision
54
detection area.
(2) Click Stop Drawing to finish drawing.
Notes:
You can draw up to 8 motion detection areas on the same image.
You can click Clear All to clear all of the areas.
(3) Move the slider to set the
sensitivity of the detection.
Expert
Figure 6-11 Motion Detection Settings-Expert
Steps:
(1) Set the Day & Night switch mode, there are OFF, Auto-Switch, and Scheduled-Switch
selectable. If the schedule image switch mode is enabled, you can configure the
detection rule for the day and night separately.
OFF: Disable the day and night switch.
Auto-Switch: Switch the day and night mode according to the illumination
automatically.
Scheduled-Switch: Switch to the day mode at 6:00 a.m., and switch to the night mode
at 18:00 p.m.
(2) Select Area from the drop-down list.
(3) Set the values of sensitivity and proportion of object on area.
Sensitivity: The greater the value is, the easier the alarm will be triggered.
4. Set the Arming Schedule for Motion Detection.
(1) Click Arming Schedule to enter the arming schedule setting interface.