
User Manual
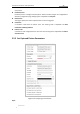
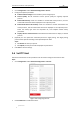
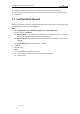
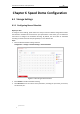
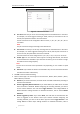
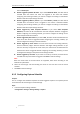
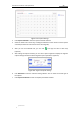
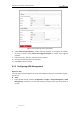
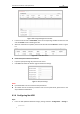
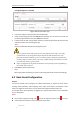
Table Of Contents
- Chapter 1 Overview
- Chapter 2 Network Connection
- Chapter 3 Accessing to the Network Speed Dome
- Chapter 4 Basic Operations
- Chapter 5 ITS Configuration
- 5.1 Set Enforcement
- 5.2 Set Vehicle Detection
- 5.3 Set Basic Configuration
- 5.4 Set Advanced Parameters
- 5.5 Pictures
- 5.6 Set FTP Host
- 5.7 Set Blocklist & Allowlist
- Chapter 6 Speed Dome Configuration
- 6.1 Storage Settings
- 6.2 Basic Event Configuration
- 6.3 Smart Event Configuration
- 6.4 PTZ Configuration
- 6.4.1 Configuring Basic PTZ Parameters
- 6.4.2 Configuring PTZ Limits
- 6.4.3 Configuring Initial Position
- 6.4.4 Configuring Park Actions
- 6.4.5 Configuring Privacy Mask
- 6.4.6 Configuring Scheduled Tasks
- 6.4.7 Clearing PTZ Configurations
- 6.4.8 Prioritize PTZ
- 6.4.9 Configuring Position Settings
- 6.4.10 Configuring Rapid Focus
- Chapter 7 System Configuration
- 7.1 Configuring Network Settings
- 7.2 Configuring Video and Audio Settings
- 7.3 Configuring Image Settings
- 7.4 Configuring System Settings
- Appendix

User Manual of Network Traffic Speed Dome
© Hikvision
51
Figure 6-6 Storage Management Interface
2. If the status of the disk is Uninitialized, check the corresponding checkbox to select the disk
and click Format to start initializing the disk.
3. When the initialization completed, the status of disk will become Normal as shown in Figure
6-7.
Figure 6-7 View Disk Status
Define the Quota for Record and Pictures
1. Input the quota percentage for picture and for record.
2. Click Save and refresh the browser page to activate the settings.
Figure 6-8 Quota Settings
Notes:
Up to 8 NAS disks can be connected to the speed dome.
To initialize and use the memory card after insert it to the speed dome, please refer to the
steps of NAS disk initialization
6.1.4 Configuring Net HDD
Steps:
1. Enter the NAS (Network-Attached Storage) settings interface: Configuration > Storage >