
User Manual
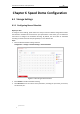
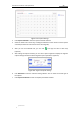
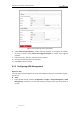
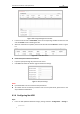
Table Of Contents
- Chapter 1 Overview
- Chapter 2 Network Connection
- Chapter 3 Accessing to the Network Speed Dome
- Chapter 4 Basic Operations
- Chapter 5 ITS Configuration
- 5.1 Set Enforcement
- 5.2 Set Vehicle Detection
- 5.3 Set Basic Configuration
- 5.4 Set Advanced Parameters
- 5.5 Pictures
- 5.6 Set FTP Host
- 5.7 Set Blocklist & Allowlist
- Chapter 6 Speed Dome Configuration
- 6.1 Storage Settings
- 6.2 Basic Event Configuration
- 6.3 Smart Event Configuration
- 6.4 PTZ Configuration
- 6.4.1 Configuring Basic PTZ Parameters
- 6.4.2 Configuring PTZ Limits
- 6.4.3 Configuring Initial Position
- 6.4.4 Configuring Park Actions
- 6.4.5 Configuring Privacy Mask
- 6.4.6 Configuring Scheduled Tasks
- 6.4.7 Clearing PTZ Configurations
- 6.4.8 Prioritize PTZ
- 6.4.9 Configuring Position Settings
- 6.4.10 Configuring Rapid Focus
- Chapter 7 System Configuration
- 7.1 Configuring Network Settings
- 7.2 Configuring Video and Audio Settings
- 7.3 Configuring Image Settings
- 7.4 Configuring System Settings
- Appendix

User Manual of Network Traffic Speed Dome
© Hikvision
50
Figure 6-5 Configuring capture parameters
8. Check Enable Timing Snapshot to enable continuous snapshot, and configure the schedule
of timing snapshot. Check Enable Event-triggered Snapshot to enable event-triggered
snapshot.
9. Select the format, resolution, and quality of the snapshot.
10. Set the time interval between two snapshots.
11. Click Save to save the settings.
6.1.3 Configuring HDD Management
Before you start:
The local storage should be properly mounted and configured to store the recorded files, log files,
pictures, etc.
Steps:
1. Enter the HDD settings interface (Configuration > Storage > Storage Management > HDD
Management), in which you can view the capacity, free space, status, type and property of
the disk.