
User Manual
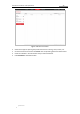
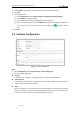
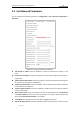
Table Of Contents
- Chapter 1 Overview
- Chapter 2 Network Connection
- Chapter 3 Accessing to the Network Speed Dome
- Chapter 4 Basic Operations
- Chapter 5 ITS Configuration
- 5.1 Set Enforcement
- 5.2 Set Vehicle Detection
- 5.3 Set Basic Configuration
- 5.4 Set Advanced Parameters
- 5.5 Pictures
- 5.6 Set FTP Host
- 5.7 Set Blocklist & Allowlist
- Chapter 6 Speed Dome Configuration
- 6.1 Storage Settings
- 6.2 Basic Event Configuration
- 6.3 Smart Event Configuration
- 6.4 PTZ Configuration
- 6.4.1 Configuring Basic PTZ Parameters
- 6.4.2 Configuring PTZ Limits
- 6.4.3 Configuring Initial Position
- 6.4.4 Configuring Park Actions
- 6.4.5 Configuring Privacy Mask
- 6.4.6 Configuring Scheduled Tasks
- 6.4.7 Clearing PTZ Configurations
- 6.4.8 Prioritize PTZ
- 6.4.9 Configuring Position Settings
- 6.4.10 Configuring Rapid Focus
- Chapter 7 System Configuration
- 7.1 Configuring Network Settings
- 7.2 Configuring Video and Audio Settings
- 7.3 Configuring Image Settings
- 7.4 Configuring System Settings
- Appendix

User Manual of Network Traffic Speed Dome
© Hikvision
39
2. Select a scene to start configuration.
3. Set detection scene.
1) Edit Scene Name.
2) Select Scene Direction as demand. Scene direction stands for the direction of traffic
flow.
3) Check Enable to activate the scene.
4. Draw lane area.
1) Click Lock to avoid accidental PTZ changing during configuration.
2) Adjust PTZ to obtain the target scene.
3) Click Add on Lane Area to add a lane.
4) Set the lane parameters, such as vehicle moving direction and line type.
5) Adjust the lane position by dragging the endpoints of the blue lane lines.
6) Repeat to add and adjust other lane areas.
5. Select detection mode as Enforcement, and click Vehicle on Non-motor Vehicle Lane.
6. Check Enable.
7. Set parameters for the function.
Amount of Picture: Set the captured picture number for each violation incident.
Sensitivity: The sensitivity of triggering capture. Higher sensitivity means easier to
trigger the detection.
Lane No. Linkage: Only checked lane is armed for vehicle on non-motor vehicle lane
detection.
8. Click Save.
5.2 Set Vehicle Detection
You can set rules to detect vehicles and license plate in configured area. The device uploads the
captured pictures of vehicle to the center.
Steps:
1. Go to Configuration > ITS > Common Settings > Speed Dome Rule Settings
2. Select a scene to start configuration.
3. Set detection scene.
1) Edit Scene Name.
2) Select Scene Direction as demand. Scene direction stands for the direction of traffic
flow.
3) Check Enable to activate the scene.
4. Draw lane area.
1) Click Lock to avoid accidental PTZ changing during configuration.
2) Adjust PTZ to obtain the target scene.
3) Click Add on Lane Area to add a lane.
4) Set the lane parameters, such as vehicle moving direction and line type.
5) Adjust the lane position by dragging the endpoints of the blue lane lines.
6) Repeat to add and adjust other lane areas.
5. Select detection mode as Vehicle Detection.
6. Check Enable.