
User Manual
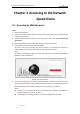
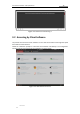
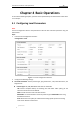
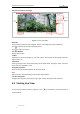
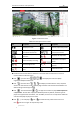
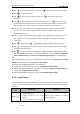
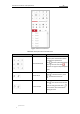
Table Of Contents
- Chapter 1 Overview
- Chapter 2 Network Connection
- Chapter 3 Accessing to the Network Speed Dome
- Chapter 4 Basic Operations
- Chapter 5 ITS Configuration
- 5.1 Set Enforcement
- 5.2 Set Vehicle Detection
- 5.3 Set Basic Configuration
- 5.4 Set Advanced Parameters
- 5.5 Pictures
- 5.6 Set FTP Host
- 5.7 Set Blocklist & Allowlist
- Chapter 6 Speed Dome Configuration
- 6.1 Storage Settings
- 6.2 Basic Event Configuration
- 6.3 Smart Event Configuration
- 6.4 PTZ Configuration
- 6.4.1 Configuring Basic PTZ Parameters
- 6.4.2 Configuring PTZ Limits
- 6.4.3 Configuring Initial Position
- 6.4.4 Configuring Park Actions
- 6.4.5 Configuring Privacy Mask
- 6.4.6 Configuring Scheduled Tasks
- 6.4.7 Clearing PTZ Configurations
- 6.4.8 Prioritize PTZ
- 6.4.9 Configuring Position Settings
- 6.4.10 Configuring Rapid Focus
- Chapter 7 System Configuration
- 7.1 Configuring Network Settings
- 7.2 Configuring Video and Audio Settings
- 7.3 Configuring Image Settings
- 7.4 Configuring System Settings
- Appendix

User Manual of Network Traffic Speed Dome
© Hikvision
20
Click to start live view and the icon turns into . Click the icon again to stop live view.
Click to capture the picture.
Click to start recording and the icon turns into . Click the icon again to stop
recording.
Click to enable digital zoom function and the icon turns into . Then click and drag
the mouse towards low right direction to draw a rectangle on the image as the desired zoom.
After viewing it you can click any place of the picture to get back to normal picture.
Click the on the toolbar to enter the regional exposure operation mode and the icon
turns into . Then click and drag the mouse to draw a rectangle on the image as the
desired exposure region.
Click the on the toolbar to enter the regional focus operation mode and the icon turns
into . Then click and drag the mouse to draw a rectangle on the image as the desired
focus region.
Click to display the . Drag the slider to adjust the volume.
Click to enable Pixel Counter. Draw an area in live view window, and it shows the height
and width of the selected area.
Click to enable quick setup of image/video related parameters, including Specify Display,
OSD and Video/Audio parameters. For detailed configuration, refer to Section 7.2 Configuring
Video and Audio Settings and Section 7.3 Configuring Image Settings for more information.
Note:
Before using the two-way audio or recording with audio functions, set the Stream Type to Video
& Audio referring to section 7.2.1 Configuring Video Settings.
Please refer to the following sections for more information:
Configuring remote recording in section 6.1.1 Configuring Record Schedule.
Setting the image quality of the live video in section 7.3 Configuring Image Settings and
section 7.2.1 Configuring Video Settings.
Setting the OSD text on live video in section 7.3.2 Configuring OSD Settings.
4.3.1 Install Plug-in
Certain operation system and web browser may restrict the display and operation of the camera
function. You should install plug-in or complete certain settings to ensure normal display and
operation.
Operation
System
Web Browser
Operation
Windows
Internet Explorer 8+
Google Chrome 56 and earlier
version
Mozilla Firefox 51 and earlier version
Follow pop-up prompts to complete
plug-in installation.