
User Manual
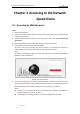
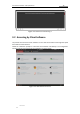
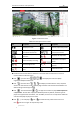
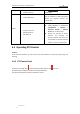
Table Of Contents
- Chapter 1 Overview
- Chapter 2 Network Connection
- Chapter 3 Accessing to the Network Speed Dome
- Chapter 4 Basic Operations
- Chapter 5 ITS Configuration
- 5.1 Set Enforcement
- 5.2 Set Vehicle Detection
- 5.3 Set Basic Configuration
- 5.4 Set Advanced Parameters
- 5.5 Pictures
- 5.6 Set FTP Host
- 5.7 Set Blocklist & Allowlist
- Chapter 6 Speed Dome Configuration
- 6.1 Storage Settings
- 6.2 Basic Event Configuration
- 6.3 Smart Event Configuration
- 6.4 PTZ Configuration
- 6.4.1 Configuring Basic PTZ Parameters
- 6.4.2 Configuring PTZ Limits
- 6.4.3 Configuring Initial Position
- 6.4.4 Configuring Park Actions
- 6.4.5 Configuring Privacy Mask
- 6.4.6 Configuring Scheduled Tasks
- 6.4.7 Clearing PTZ Configurations
- 6.4.8 Prioritize PTZ
- 6.4.9 Configuring Position Settings
- 6.4.10 Configuring Rapid Focus
- Chapter 7 System Configuration
- 7.1 Configuring Network Settings
- 7.2 Configuring Video and Audio Settings
- 7.3 Configuring Image Settings
- 7.4 Configuring System Settings
- Appendix

User Manual of Network Traffic Speed Dome
© Hikvision
13
Chapter 3 Accessing to the Network
Speed Dome
3.1 Accessing by Web Browsers
Steps:
1. Open the web browser.
2. In the address field, input the IP address of the network speed dome, e.g., 192.168.1.64, and
enter the login interface.
3. Activate the speed dome for the first time using, refer to the section 2.1.2 Activating the
Speed Dome.
4. Select English as the interface language on the top-right of login interface.
5. Input the user name and password and click Login.
The admin user should configure the device accounts and user/operator permissions
properly. Delete the unnecessary accounts and user/operator permissions.
Note:
The device IP address gets locked if the admin user performs 7 failed password attempts (5
attempts for the user/operator).
Figure 3-1 Login Interface
6. A pop-up message appears if you don't have matched plug-in installed in your computer, and
you are required to install the plug-in before viewing the live view and managing the camera.
Close the web browser and follow the prompts to finish the plug-in installation.
Notes:
You may have to close the web browser to install the plug-in. Reopen the web browser
and log in again after installing the plug-in.
The operations of installing the plug-in on different web browsers may differ.