
User Manual
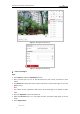
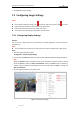
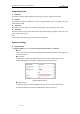
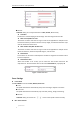
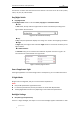
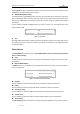
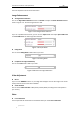
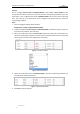
Table Of Contents
- Chapter 1 Overview
- Chapter 2 Network Connection
- Chapter 3 Accessing to the Network Speed Dome
- Chapter 4 Basic Operations
- Chapter 5 ITS Configuration
- 5.1 Set Enforcement
- 5.2 Set Vehicle Detection
- 5.3 Set Basic Configuration
- 5.4 Set Advanced Parameters
- 5.5 Pictures
- 5.6 Set FTP Host
- 5.7 Set Blocklist & Allowlist
- Chapter 6 Speed Dome Configuration
- 6.1 Storage Settings
- 6.2 Basic Event Configuration
- 6.3 Smart Event Configuration
- 6.4 PTZ Configuration
- 6.4.1 Configuring Basic PTZ Parameters
- 6.4.2 Configuring PTZ Limits
- 6.4.3 Configuring Initial Position
- 6.4.4 Configuring Park Actions
- 6.4.5 Configuring Privacy Mask
- 6.4.6 Configuring Scheduled Tasks
- 6.4.7 Clearing PTZ Configurations
- 6.4.8 Prioritize PTZ
- 6.4.9 Configuring Position Settings
- 6.4.10 Configuring Rapid Focus
- Chapter 7 System Configuration
- 7.1 Configuring Network Settings
- 7.2 Configuring Video and Audio Settings
- 7.3 Configuring Image Settings
- 7.4 Configuring System Settings
- Appendix

User Manual of Network Traffic Speed Dome
© Hikvision
102
Purpose:
You can configure Link to Preset or Scheduled-Switch in this interface. Link to Preset: Set the
time period and linked scene for the preset and check the corresponding checkbox to go to the
linked scene in the configured time period. Scheduled-Switch: Set the time period and linked
scene and it will go to the linked scene in the configured time period when you check the
corresponding checkbox.
Steps:
1. Enter the Image Parameters Switch interface:
Configuration > Image > Image Parameters Switch
2. Check the checkbox of Link to Preset or Scheduled-Switch to enable the function. (Only one
function can be enabled in the same time.)
3. When you enable the function of Link to Preset, select one preset from the drop-down list,
check the corresponding checkbox, set the time period and the linked scene for the selected
preset. (Up to 4 periods can be configured for one preset.)
Figure 7-41 Link to Preset
Figure 7-42 Linked Scene
4. When you enable the function of Scheduled-Switch, check the corresponding checkbox, set
the time period and the linked scene.
Figure 7-43 Schedule-Switch
5. Click Save to save the settings.