
User Manual
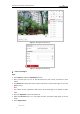
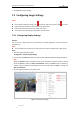
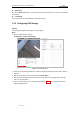
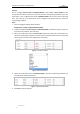
Table Of Contents
- Chapter 1 Overview
- Chapter 2 Network Connection
- Chapter 3 Accessing to the Network Speed Dome
- Chapter 4 Basic Operations
- Chapter 5 ITS Configuration
- 5.1 Set Enforcement
- 5.2 Set Vehicle Detection
- 5.3 Set Basic Configuration
- 5.4 Set Advanced Parameters
- 5.5 Pictures
- 5.6 Set FTP Host
- 5.7 Set Blocklist & Allowlist
- Chapter 6 Speed Dome Configuration
- 6.1 Storage Settings
- 6.2 Basic Event Configuration
- 6.3 Smart Event Configuration
- 6.4 PTZ Configuration
- 6.4.1 Configuring Basic PTZ Parameters
- 6.4.2 Configuring PTZ Limits
- 6.4.3 Configuring Initial Position
- 6.4.4 Configuring Park Actions
- 6.4.5 Configuring Privacy Mask
- 6.4.6 Configuring Scheduled Tasks
- 6.4.7 Clearing PTZ Configurations
- 6.4.8 Prioritize PTZ
- 6.4.9 Configuring Position Settings
- 6.4.10 Configuring Rapid Focus
- Chapter 7 System Configuration
- 7.1 Configuring Network Settings
- 7.2 Configuring Video and Audio Settings
- 7.3 Configuring Image Settings
- 7.4 Configuring System Settings
- Appendix

User Manual of Network Traffic Speed Dome
© Hikvision
100
Zoom Limit
You can set Zoom Limit value to limit the maximum value of zooming. The value can be selected
from the list.
Local Output
Set it as ON or OFF to enable/disable local output function.
7.3.2 Configuring OSD Settings
Purpose:
The speed dome supports following on screen displays:
Steps:
1. Enter the OSD settings interface:
Configuration > Image > OSD Settings
Figure 7-39 OSD Settings
2. Check the corresponding checkbox to select the display of speed dome name, date or week if
required.
3. Edit the speed dome name in the text field of Camera Name.
4. Select from the drop-down list to set the time format, date format, display mode, OSD size,
font color, and alignment.
5. You can use the mouse to click and drag the text frame IPdome in the live view window to
adjust the OSD position.