Handheld Thermal Monocular User Manual . COPYRIGHT © 2018 Hikvision.
About This Manual COPYRIGHT © 2018 Hangzhou Hikvision Digital Technology Co., Ltd. ALL RIGHTS RESERVED. Any and all information, including, among others, wordings, pictures, graphs are the properties of Hangzhou Hikvision Digital Technology Co., Ltd. or its subsidiaries (hereinafter referred to be “Hikvision”).
guarantee that interference will not occur in a particular installation. If this equipment does cause harmful interference to radio or television reception, which can be determined by turning the equipment off and on, the user is encouraged to try to correct the interference by one or more of the following measures: —Reorient or relocate the receiving antenna. —Increase the separation between the equipment and receiver.
isotropically radiated power (e.i.r.p.) is not more than that necessary for successful communication. Conformément à la réglementation d'Industrie Canada, le présent émetteur radio peut fonctionner avec une antenne d'un type et d'un gain maximal (ou inférieur) approuvé pour l'émetteur par Industrie Canada.
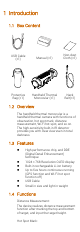
1 Introduction 1.1 Box Content USB Cable (×1) Manual (×1) Non-dust Cloth (×1) Protective Bag (×1) Handheld Thermal Monocular (×1) Neck Belt(×1) 1.2 Overview The handheld thermal monocular is a handheld thermal camera with functions of observation, hot spot mark, distance measurement, Wi-Fi hot spot, and so on. The high-sensitivity built-in IR detector provides you with clear view even in total darkness. 1.
The device detects and marks the hot spot of highest temperature. Wi-Fi & Hot Spot: Device can capture snapshots, record videos, and set parameters via APP after being connected to your phone. GPS Function: The device can be located with GPS system. Mode Switch: Device supports pallet switch and distance measurement. Storage: Built-in memory module supports video recording/snapshot capturing. Digital Zoom: Device supports 1× and 2× digital zoom.
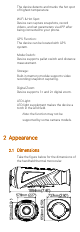
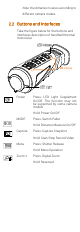
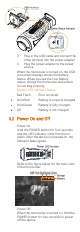
Note: the dimension varies according to different camera modes. 2.2 Buttons and Interfaces Take the figure below for the buttons and interfaces description of handheld thermal monocular. 1 Power Press: LED Light Supplement On/Off.
Lens Cover Cover the lens when you are not using the monocular. LED Indicator When the LED indicator is on: the device is activating. Sight Adjust Knob Slide the sight adjust knob to adjust the view according to your degree of myopia. USB Interface Charge the battery and export videos/snapshots with the USB cable. Note: For detailed operations of the menu, refer to Menu Operation Section. 3 Basic Operations 3.
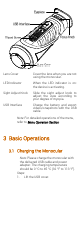
2. Plug in the USB cable and connect the other terminal into the power adapter. 3. Plug the power adapter to the power source. When the monocular is turned on, the OSD (on-screen display) shows the battery status. When you see the Low Battery status, charge the monocular and ensure it’s working properly. Battery LED Indicator Status Red Flash Error occurred. ● Solid Red Battery is properly charged. ● Solid Green Battery is fully charged. ● Off Battery is not charged. 3.
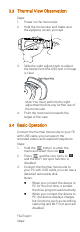
3.3 Thermal View Observation Steps: 1. Power on the monocular. 2. Hold the monocular and make sure the eyepiece covers your eye. 3. 4. Slide the sight adjust knob to adjust the diopter until the OSD text or image is clear. Note: You must perform the sight adjustment before any further use of the monocular. Point the monocular towards the target of the view. 3.4 Basic Operation Connect the thermal monocular to your PC with USB cable, you can export the recorded videos and captured snapshots. Steps: 1.
1. 2. 3. Connect the thermal monocular to your PC with USB cable and open the detected disk. Enter DCIM>100EZVIZ to view the videos and snapshots. Select and copy the videos to PC and play the file with the player. Select and copy the snapshots to PC and view the files. Disconnect the device from your PC. Upgrade Steps: 1. Connect the thermal monocular to your PC with USB cable and open the detected disk. 2. Copy the upgrade file and paste it to the root directory of the device. 3.
or hot spot and record/capture with App. Press to enter distance measu rement mode. For details, refer to Section 4.2 Distance Measurement. Press to enable or disable the GPS function. Press to adjust the brightness. The icons on the left indicate: high Brightness, medium Brightness, and low Brightness. Press to view the version num ber and serial number. Press to restore all parameters to default settings.
4.2 Distance Measurement Before you start: In the view mode, you can hold the button to enter the distance measurement mode. Or, you can hold the button to enter the menu and select to enter the distance measurement mode. Purpose: You can mark the top and bottom of the target in the distance to calculate the distance in between. Steps: 1. Enter the distance measurement mode. You can refer to Before you start part above. 2. Define the target height. a) Press to enter the height setting interface.
corner of the live view interface. Note: Enter the distance measurement interface, press view the measured distance. to 4.3 Hot Spot Mark In the menu, select / and press to enable/disable hot spot mark (marking the spot of highest temperature). When the hot spot mark is enabled, the mark displays in the spot of the highest temperature. When the scene changes, the mark moves. 4.4 Record/Capture Video Recording In the view mode, hold the button for three seconds, and the monocular starts to record.
once to release the shutter once. 4.7 Network Configuration Connect your phone to the Wi-Fi or hot spot of the monocular, you can configure the parameters and realize functions of the device. Wi-Fi Steps: 1. Hold the button to show the menu of monocular. 2. Press the key to enable Wi-Fi function. 3. Setting the Wi-Fi name and password of your phone or the router as follow: Wi-Fi Name: WLAN-IPTP. Wi-Fi Password: abcd1234. 4.
5 FAQ Q: A: Q: A: Q: A: Q: A: Q: A: 1. 2. 3. Q: A: Q: A: 1. 2. 3. The charge indicator flashes improperly. Examine whether the device is charged with standard power adapter and the charging temperature is 0 °C to 45 °C (32 °F to 113 °F). Device power indicator is off. Examine whether the device is off-battery. The image of the monocular is not clear. Perform the sight adjustment referring to section 3.3. Wi-Fi is not found. Examine whether the Wi-Fi function is turned on.