
Quick Start Guide


ECT-B32V2 Quick Start Guide
QSG ECT-B32V2 031518NA 9
For a cement wall, expansion bolts are required to fix the
camera. For a wooden wall, self-tapping screws are required.
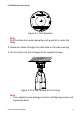
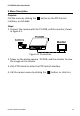
5. Connect the corresponding power cord and video cable.
6. Power on the camera to check whether the image on the
monitor is from the optimum angle. If not, adjust the
surveillance angle.
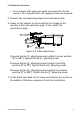
Figure 2-3 3-Axis Adjustment
1) Loosen the No.① adjusting screw to adjust the pan position
[0° to 360°]. Tighten the No.① adjusting screw.
2) Loosen the No.② adjusting screw to adjust the tilting
position [0° to 90°]. Tighten the No.② adjusting screw.
3) Loosen the No.③ adjusting screw to adjust the rotation
position [0° to 360°]. Tighten the No.③ adjusting screw.
7. Fit the black liner back to the camera and tighten the screws on
the bubble of the dome camera to finish the installation.