ECT-B32V2 TurboHD Bullet Camera Quick Start Guide
ECT-B32V2 Quick Start Guide Manual Illustrations and Features Graphics (screen shots, product pictures, etc.) in this document are for illustrative purposes only. Your actual product may differ in appearance. Your product might not support all features discussed in this document. Hikvision USA Inc., 18639 Railroad St., City of Industry, CA 91748, USA • Hikvision Canada, 4848 rue Levy, Saint Laurent, Quebec, Canada, H4R 2P1 Telephone: +1-909-895-0400 • Toll Free in USA: +1-866-200-6690 • E-Mail: sales.
ECT-B32V2 Quick Start Guide for specific battery information. The battery is marked with this symbol, which may include lettering to indicate cadmium (Cd), lead (Pb), or mercury (Hg). For proper recycling, return the battery to your supplier or to a designated collection point. For more information see: www.recyclethis.info. Industry Canada ICES-003 Compliance This device meets the CAN ICES-3 (A)/NMB-3(A) standards requirements. Warning This is a class A product.
ECT-B32V2 Quick Start Guide • Do not aim the camera at the sun or extra bright places. • The sensor may be burned out by a laser beam, so when any laser equipment is in using, make sure that the surface of sensor will not be exposed to the laser beam. • Do not expose the device to high electromagnetic radiation or extremely hot, cold, dusty or damp environment. • To avoid heat accumulation, good ventilation is required for the operating environment.
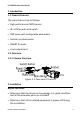
ECT-B32V2 Quick Start Guide Contents 1 Introduction .......................................................................... 6 1.1 Product Features............................................................... 6 1.2 Overview ........................................................................... 6 1.2.1 Camera Overview..................................................... 6 2 Installation ............................................................................ 6 2.1 Installation of Camera .......
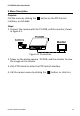
ECT-B32V2 Quick Start Guide 1 Introduction 1.1 Product Features The main features are as follows: High performance CMOS sensor IR cut filter with auto switch OSD menu with configurable parameters Internal synchronization SMART IR mode 3-axis adjustment 1.2 Overview 1.2.1 Camera Overview Figure 1-1 Overview of Camera 2 Installation Before You Start: Make sure that the device in the package is in good condition and all the assembly parts are included.
ECT-B32V2 Quick Start Guide Check the specification of the products for the installation environment. Check whether the power supply is matched with your power output to avoid the damage. Make sure the wall is strong enough to withstand three times the weight of the camera and the bracket. If the wall is cement, insert expansion bolts before installing the camera. If the wall is wooden, use self-tapping screws to secure the camera.
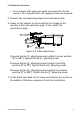
ECT-B32V2 Quick Start Guide Figure 2-1 Drill Template Note: Drill the cable hole when adopting ceiling outlet to route the cable. 3. Route the cables through the cable hole or the side opening. 4. Fix the camera to the ceiling with the supplied screws. Figure 2-2 Fix the Camera to the Ceiling Note: The supplied screw package contains self-tapping screws and expansion bolts.
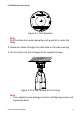
ECT-B32V2 Quick Start Guide For a cement wall, expansion bolts are required to fix the camera. For a wooden wall, self-tapping screws are required. 5. Connect the corresponding power cord and video cable. 6. Power on the camera to check whether the image on the monitor is from the optimum angle. If not, adjust the surveillance angle. Figure 2-3 3-Axis Adjustment 1) Loosen the No.① adjusting screw to adjust the pan position [0° to 360°]. Tighten the No.① adjusting screw. 2) Loosen the No.
ECT-B32V2 Quick Start Guide 3 Menu Description Purpose: Call the menu by clicking the interface, or click Iris+. button on the PTZ Control Steps: 1. Connect the camera with the TVI DVR, and the monitor, shown as figure 3-1. Figure 3-1 Connection 2. Power on the analog camera, TVI DVR, and the monitor to view the image on the monitor. 3. Click PTZ Control to enter the PTZ Control interface. 4. Call the camera menu by clicking the QSG ECT-B32V2 031518NA button, or click Iris+.
ECT-B32V2 Quick Start Guide Figure 3-2 Main Menu Overview 5. Click the direction arrow to control the camera. 1)Click up/down direction button to select the item. 2)Click Iris + to confirm the selection. 3)Click left/right direction button to adjust the value of the selected item. 3.1 FORMAT You can set the format as 2 MP @ 30 fps.
ECT-B32V2 Quick Start Guide 3.2 EXPOSURE Exposure describes the brightness-related parameters, which you can set the EXPOSURE MODE as GLOBAL, BLC, or DWDR. GLOBAL GLOBAL refers to the normal exposure mode, which sets exposure according to the whole image brightness. BLC (Backlight Compensation) BLC (Backlight Compensation) compensates light for the front object to make it clear, but this may cause the over-exposure of the background, where the light is strong.
ECT-B32V2 Quick Start Guide You can turn on/off the IR LIGHT and set the value of SMART IR in this menu DAY/NIGHT MODE IR LIGHT SMART IR BACK EXIT SAVE & EXIT B&W ON 2 Figure 3-3 B & W • IR LIGHT You can turn on/off the IR LIGHT to meet the requirements of different circumstances. • SMART IR The Smart IR function is used to adjust the light to its most suitable intensity, and prevent the image from over exposure. The SMART IR value can be adjusted from 0 to 3.
ECT-B32V2 Quick Start Guide Figure 3-4 AUTO • IR LIGHT You can turn on/off the IR LIGHT to meet the requirements of different circumstances. • SMART IR The Smart IR function is used to adjust the light to its most suitable intensity, and prevent the image from over exposure. The SMART IR value can be adjusted from 0 to 3. The higher the value is, the more obvious effects are.
ECT-B32V2 Quick Start Guide 3.4 VIDEO SETTINGS Move the cursor to VIDEO SETTINGS and click Iris+ to enter the submenu. BRIGHTNESS, CONTRAST, SHARPNESS, SATURATION, DNR, AGC, and MIRROR are adjustable. Figure 3-5 VIDEO SETTINGS • BRIGHTNESS Brightness refers to the brightness of the image. You can set the brightness value from 1 to 9 to darken or brighten the image. The higher the value, the brighter the image. • CONTRAST This feature enhances the difference in color and light between parts of an image.
ECT-B32V2 Quick Start Guide • SATURATION Adjust this feature to change the saturation of the color. The value ranges from 1 to 9. • DNR (Digital Noise Reduction) The DNR function can decrease the noise effect, especially when capturing moving images in poor light conditions and delivering more accurate and sharp image. You can set the DNR as HIGH, MEDIUM, or LOW. • AGC It optimizes the clarity of the image in poor light conditions. The AGC level can be set as High, Medium, or Low.
ECT-B32V2 Quick Start Guide 3.6 EXIT Move the cursor to EXIT and click Iris+ to exit the menu without saving. 3.7 SAVE & EXIT Move the cursor to SAVE & EXIT and click Iris+ to save the settings, and exit the menu.