
ECI-T22F2-Quick-start-Guide

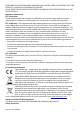
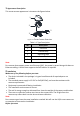

6. Install the camera body back to the mounting base.
Figure 2-4 Install the Camera Body
7. Connect the power cord and network cable.
8. Power the camera on, and set the network configuration (for details, refer to 3 Network
Camera LAN Configuration and 4 Access via Web Browser) to check whether the image is at
an optimum angle. If not, adjust the surveillance angle.
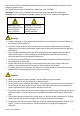
Pan: 0° to 360°
Tilt: 0° to 75°
Rotation: 0° to 360°
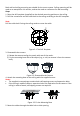
Figure 2-5 Adjust Surveillance Angle
1). Hold the camera body and rotate the enclosure to adjust the pan angle [0° to 360°].
2). Move the camera body up and down to adjust the tilt angle [0° to 75°].
3). Rotate the camera body to adjust the rotation angle [0° to 360°].
3
Network Camera LAN Configuration
Note:
The use of products with internet access carries inherent security risks. In order to avoid
network attacks and information leakage, strengthen your own network protection.
If the product does not work properly, contact your dealer or the nearest service center for
help.
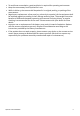
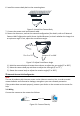
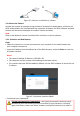
3.1 Wiring
Connect the camera to the network as follows:
Network Cable
or
Network Camera
Computer
Connect Directly
Figure 3-1