
Quick Start Guide


ECI-D64Z2 Network Dome Camera Quick Start Guide
QSG VE ECI-D64Z2 041118NA 9
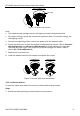
Back Box
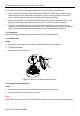
Secure the Camera
Figure 2-4
Note:
●
The supplied screw package contains self-tapping screws and expansion bolts.
●
For cement ceilings, secure the camera with expansion bolts. For wooden ceilings, use
self-tapping screws.
5. Connect corresponding cables, such as the power cord and network cable.
6. Power the camera on, and set the network configuration (for details, refer to 3 Camera
LAN Configuration and 4 Access via Web Browser) to check whether the image was
shot from the right angle. If not, adjust the surveillance angle (for details, refer to
section 2.3.1 3-Axis Adjustment).
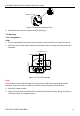
7. Replace the inner black liner.
8. Install the bubble back onto the camera and replace the screws.
Secure Black Liner and Bubble
Figure 2-5
2.2.2 Conduit Installation
To route the cables from side of the camera, install a cable routing conduit.
Steps:
1. Rotate the waterproof plug counterclockwise and remove it.