
Quick Start Guide


QSG ECI-B62Z2 030618NA 3
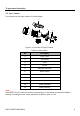
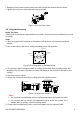
4.
Rotate the front cover clockwise back onto the camera and replace the sun shield.
5.
Tighten the lock screw clockwise to fix the sun shield.
DC
1
2
VIN
Fix the Front Cover
Figure 2-4
2.2
Ceiling/Wall Mounting
Before You Start:
These types of cameras are equipped with a bracket. They can be mounted directly to a wall
or ceiling.
Steps:
1. Stick the supplied drill template to the wall or ceiling where you intend to install the
camera.
2. Drill screw holes in the wall or ceiling according to the drill template.
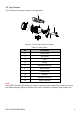
Ceiling Mounting
1
1
1
1
2
2 2
2
1:Sc rew Hole for
Bracket
2:Sc rew Hole for
Mounting Base
Ø 100 mm
Ø 36 mm
8-Ø 5 mm
Drilling Holes in the Wall/Ceiling
Figure 2-5
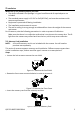
3. To route the cables through the wall (or ceiling), drill a cable hole according to the drill
template. Skip this step if you want to route the cables on the surface of the wall (or the
ceiling).
4. Route the camera cables.
5. Secure the camera to the wall (or ceiling) with the supplied screws.
Drill Template
Drill Template
Secure the Camera
Figure 2-6
Note:
●
The supplied screw package contains self-tapping screws and expansion bolts.
●
For a cement wall (or ceiling), use expansion bolts to secure the camera. For a
wooden wall (or ceiling), use self-tapping screws.
6. Connect the corresponding cables, such as the power cord or network cable.