
User Manual
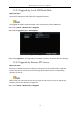
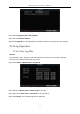


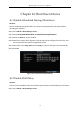
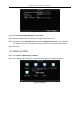

Table Of Contents
- Chapter 1 Panel Introduction
- Chapter 2 Installation and Connections
- Chapter 3 Start Up Device
- Chapter 4 Network
- Chapter 5 IP Camera
- Chapter 6 Camera Management
- Chapter 7 Live View
- Chapter 8 Storage
- Chapter 9 Playback
- Chapter 10 Platform
- Chapter 11 Backup
- Chapter 12 Events and Alarms
- 12.1 Configure Motion Detection Alarm
- 12.2 Configure Alarm Input
- 12.3 Configure Alarm Output
- 12.4 Configure Alarm Terminal
- 12.5 Configure Video Loss Alarm
- 12.6 Configure Video Tampering Alarm
- 12.7 Configure Video Quality Diagnostics
- 12.8 Configure Exception Alarm
- 12.9 Configure Satellite Positioning
- 12.10 Configure G-Sensor Alarm
- 12.11 Configure Arming Schedule and Linkage Actions
- 12.12 Configure Detection Area
- Chapter 13 User Account Management
- Chapter 14 General System Configuration
- Chapter 15 Maintenance
- Chapter 16 Shut Down Device
- Chapter 17 Appendix

Mobile Digital Video Recorder User Manual
70
15.3.1 Upgrade by Local USB Flash Disk
Before you start:
Connect the USB device that contains the upgrade firmware.
The upgrade firmware should be stored in the root directory of the USB device.
Step 1 Go to Menu > Maintenance > Upgrade.
Step 2 Select Upgrade Type as USB Upgrade.
Figure 15-3 Upgrade Interface
Step 3 Click Upgrade to start upgrading and reboot the device to activate the new settings.
15.3.2 Upgrade by Remote FTP server
Before you start:
Ensure the network connection of the PC (running FTP server) and the DVR is valid and
correct. Run the FTP server on the PC and copy the firmware into the corresponding
directory of your PC.
Refer to the user manual of the FTP server to set the FTP server on your PC and put the
firmware file into the directory as required.
Step 1 Go to Menu > Maintenance > Upgrade.