
User Manual
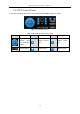

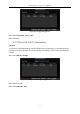
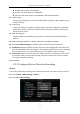
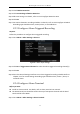
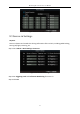
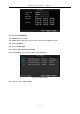
Table Of Contents
- Chapter 1 Panel Introduction
- Chapter 2 Installation and Connections
- Chapter 3 Start Up Device
- Chapter 4 Network
- Chapter 5 IP Camera
- Chapter 6 Camera Management
- Chapter 7 Live View
- Chapter 8 Storage
- Chapter 9 Playback
- Chapter 10 Platform
- Chapter 11 Backup
- Chapter 12 Events and Alarms
- 12.1 Configure Motion Detection Alarm
- 12.2 Configure Alarm Input
- 12.3 Configure Alarm Output
- 12.4 Configure Alarm Terminal
- 12.5 Configure Video Loss Alarm
- 12.6 Configure Video Tampering Alarm
- 12.7 Configure Video Quality Diagnostics
- 12.8 Configure Exception Alarm
- 12.9 Configure Satellite Positioning
- 12.10 Configure G-Sensor Alarm
- 12.11 Configure Arming Schedule and Linkage Actions
- 12.12 Configure Detection Area
- Chapter 13 User Account Management
- Chapter 14 General System Configuration
- Chapter 15 Maintenance
- Chapter 16 Shut Down Device
- Chapter 17 Appendix

Mobile Digital Video Recorder User Manual
46
Figure 8-8 Alarm Terminal
Step 2 Check Enable Alarm Terminal.
Step 3 Edit the terminal name in Terminal Name text field.
Step 4 Select Set of Trigger Record Channel to set alarm triggered recording channel(s).
Step 5 Click OK.
8.2.5 Configure Schedule
Step 1 Go to Menu > Basic Settings > Record.
Step 2 Click Set of Schedule.
Step 3 Check Enable Schedule.
Step 4 Select the day from the dropdown list for settings.
Step 5 Configure all day schedule or custom schedule.
Check All Day to enable all-day recording, and then select the recording type from the
drop-down list.
Uncheck All Day, customize the time period for recording, and select the recording type
for each time period.
Step 6 Click OK.
5 recording types are selectable: Normal, Motion Detection, Alarm, Motion|Alarm, and
Motion&Alarm.
Up to 8 time periods can be set for each day and each of the time periods cannot be
overlapped.