
User Manual
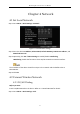
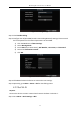
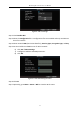
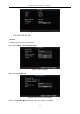
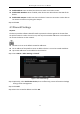

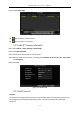
Table Of Contents
- Chapter 1 Panel Introduction
- Chapter 2 Installation and Connections
- Chapter 3 Start Up Device
- Chapter 4 Network
- Chapter 5 IP Camera
- Chapter 6 Camera Management
- Chapter 7 Live View
- Chapter 8 Storage
- Chapter 9 Playback
- Chapter 10 Platform
- Chapter 11 Backup
- Chapter 12 Events and Alarms
- 12.1 Configure Motion Detection Alarm
- 12.2 Configure Alarm Input
- 12.3 Configure Alarm Output
- 12.4 Configure Alarm Terminal
- 12.5 Configure Video Loss Alarm
- 12.6 Configure Video Tampering Alarm
- 12.7 Configure Video Quality Diagnostics
- 12.8 Configure Exception Alarm
- 12.9 Configure Satellite Positioning
- 12.10 Configure G-Sensor Alarm
- 12.11 Configure Arming Schedule and Linkage Actions
- 12.12 Configure Detection Area
- Chapter 13 User Account Management
- Chapter 14 General System Configuration
- Chapter 15 Maintenance
- Chapter 16 Shut Down Device
- Chapter 17 Appendix

Mobile Digital Video Recorder User Manual
25
Enable WiFi AP: Once enabled, the device can work as a wireless router.
Enable WiFi Broadcast: Once enabled, other devices are able to detect the SSID of the
device.
Enable WiFi Hotspot: Enable it to share the device’s internet connection. Other devices
can access to internet via joining the hotspot.
Step 4 Click OK.
4.3 Firewall Settings
Purpose:
The device provides software-based firewall to protect the device against the threats from
the public network. A white list can be set, and only the trusted IP addresses on the white list
can access the device via the network.
192.0.0.xxx is set as the default trusted IP addresses.
The IP address of the platform server to add the device is set as the trusted IP address.
Up to 16 IP addresses can be added on the white list.
Step 1 Go to Menu > Other Settings > Firewall.
Figure 4-9 Firewall Settings
Step 2 Optionally, select Enable SSH Service, thus to effectively prevent information leakage
during remote management.
Step 3 Click Add.
Step 4 Enter the trusted IP address and click OK.