
User Manual

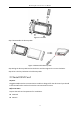
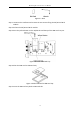
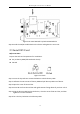
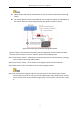
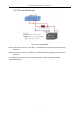
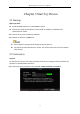
Table Of Contents
- Chapter 1 Panel Introduction
- Chapter 2 Installation and Connections
- Chapter 3 Start Up Device
- Chapter 4 Network
- Chapter 5 IP Camera
- Chapter 6 Camera Management
- Chapter 7 Live View
- Chapter 8 Storage
- Chapter 9 Playback
- Chapter 10 Platform
- Chapter 11 Backup
- Chapter 12 Events and Alarms
- 12.1 Configure Motion Detection Alarm
- 12.2 Configure Alarm Input
- 12.3 Configure Alarm Output
- 12.4 Configure Alarm Terminal
- 12.5 Configure Video Loss Alarm
- 12.6 Configure Video Tampering Alarm
- 12.7 Configure Video Quality Diagnostics
- 12.8 Configure Exception Alarm
- 12.9 Configure Satellite Positioning
- 12.10 Configure G-Sensor Alarm
- 12.11 Configure Arming Schedule and Linkage Actions
- 12.12 Configure Detection Area
- Chapter 13 User Account Management
- Chapter 14 General System Configuration
- Chapter 15 Maintenance
- Chapter 16 Shut Down Device
- Chapter 17 Appendix

Mobile Digital Video Recorder User Manual
19
Chapter 3 Start Up Device
3.1 Startup
Before you start:
Install the HDD. Refer to 2.1 Install HDD for details.
Connect the cables and modules correctly. Refer to Chapter 2 Installation and
Connections for details.
Step 1 Insert the key into the dummy HDD lock.
Step 2 Rotate it clockwise to ON status.
Do not perform any operations during the startup process.
The startup process takes about 1 minute. The system enters the live view interface
after startup.
3.2 Activation
Purpose:
For the first-time access, you need to activate the device by setting an admin password. No
operation is allowed before activation.
Step 1 Enter the same password in the text field of New Password and Confirm.
Figure 3-1 Settings Admin Password