
User Manual

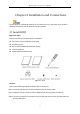

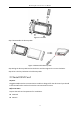
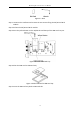
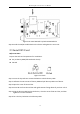
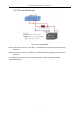
Table Of Contents
- Chapter 1 Panel Introduction
- Chapter 2 Installation and Connections
- Chapter 3 Start Up Device
- Chapter 4 Network
- Chapter 5 IP Camera
- Chapter 6 Camera Management
- Chapter 7 Live View
- Chapter 8 Storage
- Chapter 9 Playback
- Chapter 10 Platform
- Chapter 11 Backup
- Chapter 12 Events and Alarms
- 12.1 Configure Motion Detection Alarm
- 12.2 Configure Alarm Input
- 12.3 Configure Alarm Output
- 12.4 Configure Alarm Terminal
- 12.5 Configure Video Loss Alarm
- 12.6 Configure Video Tampering Alarm
- 12.7 Configure Video Quality Diagnostics
- 12.8 Configure Exception Alarm
- 12.9 Configure Satellite Positioning
- 12.10 Configure G-Sensor Alarm
- 12.11 Configure Arming Schedule and Linkage Actions
- 12.12 Configure Detection Area
- Chapter 13 User Account Management
- Chapter 14 General System Configuration
- Chapter 15 Maintenance
- Chapter 16 Shut Down Device
- Chapter 17 Appendix

Mobile Digital Video Recorder User Manual
11
Chapter 2 Installation and Connections
Product pictures in following chapters are for reference only. In the event of any conflicts
between this manual and the product, the later prevails.
2.1 Install HDD
Before You Start:
Prepare the tools and components for installation:
One factory recommended 2.5-inch HDD.
Antistatic gloves
Key to dummy HDD (delivered with device)
Cross screwdriver
Screws (delivered with device)
Figure 2-1 Tools
Purpose:
Perform the following steps to install the HDD on the device.
Step 1 Insert the key and turn counterclockwise to unlock dummy HDD.
Step 2 Unfasten the two screws of dummy HDD and pull dummy HDD out of device.
Step 3 Use cross screwdriver to loosen the two screws and remove them, and then take the
dummy HDD apart.