
User Manual
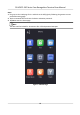
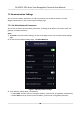
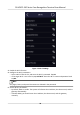
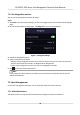
Table Of Contents
- Legal Information
- Symbol Conventions
- Regulatory Information
- Safety Instruction
- Available Models
- Chapter 1 Overview
- Chapter 2 Appearance
- Chapter 3 Installation
- Chapter 4 Wiring
- Chapter 5 Activation
- Chapter 6 Quick Operation
- Chapter 7 Basic Operation
- Chapter 8 Operation via Web Browser
- 8.1 Login
- 8.2 Live View
- 8.3 Person Management
- 8.4 Search Event
- 8.5 Configuration
- 8.5.1 Set Local Parameters
- 8.5.2 View Device Information
- 8.5.3 Set Time
- 8.5.4 Set DST
- 8.5.5 View Open Source Software License
- 8.5.6 Upgrade and Maintenance
- 8.5.7 Log Query
- 8.5.8 Security Mode Settings
- 8.5.9 Certificate Management
- 8.5.10 Change Administrator's Password
- 8.5.11 View Device Arming/Disarming Information
- 8.5.12 Network Settings
- 8.5.13 Set Video and Audio Parameters
- 8.5.14 Customize Audio Content
- 8.5.15 Set Image Parameters
- 8.5.16 Set Supplement Light Brightness
- 8.5.17 Time and Attendance Settings
- 8.5.18 Set Video Intercom Parameters
- 8.5.19 Configure SIP Parameters
- 8.5.20 Access Control Settings
- 8.5.21 Set Biometric Parameters
- 8.5.22 Set Notice Publication
- 8.5.23 Temperature Measurement Settings
- Chapter 9 Client Software Configuration
- 9.1 Configuration Flow of Client Software
- 9.2 Device Management
- 9.3 Group Management
- 9.4 Person Management
- 9.5 Configure Schedule and Template
- 9.6 Set Access Group to Assign Access Authorization to Persons
- 9.7 Configure Advanced Functions
- 9.8 Door Control
- Appendix A. Tips When Collecting/Comparing Face Picture
- Appendix B. Tips for Installation Environment
- Appendix C. Dimension

6. Tap OK to save the
sengs and go back to the Wi-Fi tab.
7. Tap to save the network parameters.
7.2.3 Set RS-485 Parameters
The face recognion terminal can connect external access controller, secure door control unit or
card reader via the RS-485 terminal.
Steps
1. Tap Comm.
(Communicaon Sengs) on the Home page to enter the Communicaon Sengs
page.
2. On the Communicaon Sengs page, tap RS-485 to enter the RS-485 tab.
Figure 7-6 Set RS-485 Parameters
3. Select an peripheral type according to your actual needs.
Note
If you select Access Controller: If connect the device to a terminal via the RS-485 interface, set
the RS-485 address as 2. If you connect the device to a controller, set the RS-485 address
according to the door No.
4. Tap the back icon at the upper le corner and you should reboot the device if you change the
parameters.
DS-K5671-3XF Series Face Recognion Terminal User Manual
31