
User Manual
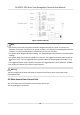
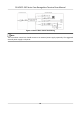

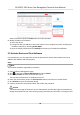
Table Of Contents
- Legal Information
- Symbol Conventions
- Regulatory Information
- Safety Instruction
- Available Models
- Chapter 1 Overview
- Chapter 2 Appearance
- Chapter 3 Installation
- Chapter 4 Wiring
- Chapter 5 Activation
- Chapter 6 Quick Operation
- Chapter 7 Basic Operation
- Chapter 8 Operation via Web Browser
- 8.1 Login
- 8.2 Live View
- 8.3 Person Management
- 8.4 Search Event
- 8.5 Configuration
- 8.5.1 Set Local Parameters
- 8.5.2 View Device Information
- 8.5.3 Set Time
- 8.5.4 Set DST
- 8.5.5 View Open Source Software License
- 8.5.6 Upgrade and Maintenance
- 8.5.7 Log Query
- 8.5.8 Security Mode Settings
- 8.5.9 Certificate Management
- 8.5.10 Change Administrator's Password
- 8.5.11 View Device Arming/Disarming Information
- 8.5.12 Network Settings
- 8.5.13 Set Video and Audio Parameters
- 8.5.14 Customize Audio Content
- 8.5.15 Set Image Parameters
- 8.5.16 Set Supplement Light Brightness
- 8.5.17 Time and Attendance Settings
- 8.5.18 Set Video Intercom Parameters
- 8.5.19 Configure SIP Parameters
- 8.5.20 Access Control Settings
- 8.5.21 Set Biometric Parameters
- 8.5.22 Set Notice Publication
- 8.5.23 Temperature Measurement Settings
- Chapter 9 Client Software Configuration
- 9.1 Configuration Flow of Client Software
- 9.2 Device Management
- 9.3 Group Management
- 9.4 Person Management
- 9.5 Configure Schedule and Template
- 9.6 Set Access Group to Assign Access Authorization to Persons
- 9.7 Configure Advanced Functions
- 9.8 Door Control
- Appendix A. Tips When Collecting/Comparing Face Picture
- Appendix B. Tips for Installation Environment
- Appendix C. Dimension

•
Aer acvaon, you should select a language according to your actual needs.
• Aer acvaon, you should select an applicaon mode. For details, see Set Applicaon Mode .
•
Aer acvaon, if you need to add the device to the client soware or other plaorms, you
should edit the device IP address. For details, see Set Network Parameters .
•
Aer acvaon, if you need to operate the device remotely via APP, you should scan the QR
code to link to the APP. For details, see .
•
Aer acvaon, if you need to add administrator to manage the device parameters, you should
set administrator. For details, see Add Administrator .
5.2 Acvate via SADP
SADP is a tool to detect, acvate and modify the IP address of the device over the LAN.
Before You Start
• Get the SADP
soware from the supplied disk or the ocial website hp://
www.hikvision.com/en/ , and install the SADP according to the prompts.
• The device and the PC that runs the SADP tool should be within the same subnet.
The following steps show how to acvate a device and modify its IP address. For batch acvaon
and IP addresses modicaon, refer to User Manual of SADP for details.
Steps
1. Run the SADP soware and search the online devices.
2. Find and select your device in online device list.
3. Input new password (admin password) and
conrm the password.
Cauon
STRONG PASSWORD RECOMMENDED-We highly recommend you create a strong password of
your own choosing (using a minimum of 8 characters, including upper case leers, lower case
leers, numbers, and special characters) in order to increase the security of your product. And
we recommend you reset your password regularly, especially in the high security system,
reseng the password monthly or weekly can beer protect your product.
Note
Characters containing admin and nimda are not supported to be set as acvaon password.
4. Click Acvate to start acvaon.
DS-K5671-3XF Series Face Recognion Terminal User Manual
15