
User Manual
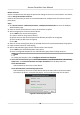
Table Of Contents
- Legal Information
- Available Model
- Regulatory Information
- Safety Instruction
- Chapter 1 Preventive and Cautionary Tips
- Chapter 2 Product Description
- Chapter 3 Main Board Description
- Chapter 4 Terminal Description
- Chapter 5 Terminal Wiring
- Chapter 6 Settings
- Chapter 7 Activation
- Chapter 8 Client Software Configuration
- 8.1 Operation on Client Software
- 8.1.1 Add Device
- 8.1.2 Select Application Scenario
- 8.1.3 Configure Other Parameters
- 8.1.4 Manage Organization
- 8.1.5 Manage Person Information
- 8.1.6 Configure Schedule and Template
- 8.1.7 Manage Permission
- 8.1.8 Configure Advanced Functions
- Configure Access Control Parameters
- Configure Individual Authentication
- Configure Card Reader Authentication Mode and Schedule
- Configure Multiple Authentication
- Configure Opening Door with First Card
- Configure Anti-Passback
- Configure Cross-Controller Anti-passing Back
- Configure Multi-door Interlocking
- Configure Authentication Password
- Configure Custom Wiegand Rule
- 8.1.9 Search Access Control Event
- 8.1.10 Configure Access Control Alarm Linkage
- 8.1.11 Manage Access Control Point Status
- 8.1.12 Control Door during Live View
- 8.1.13 Display Access Control Point on E-map
- 8.2 Remote Configuration (Web)
- 8.3 Time and Attendance
- 8.1 Operation on Client Software
- Appendix A. Tips for Scanning Fingerprint
- Appendix B. DIP Switch Description
- Appendix C. Custom Wiegand Rule Descriptions

Super Password
The specic person can open the door by inpung the super password.
Dismiss Code
Create a dismiss code which can be used to stop the buzzer of the card reader (by entering
the dismiss code on the keypad).
Note
• The duress code, super code, and dismiss code should be
dierent.
• The duress code, super password, and the dismiss code should be dierent from the
authencaon password.
• The duress code, super password, and the dismiss code should contain 4 to 8 digits.
5.
Click Status Duraon Sengs to set the door status duraon. For details, see Congure
Duraon Schedule for Door Status.
6. Click Save.
7.
Oponal: Click Copy to and select the door/oor(s) to copy the parameters to other doors/
oors.
Note
The door or oor's status duraon sengs will be copied to the selected door/oor(s) as well.
Congure Duraon Schedule for Door Status
You can congure the weekly duraon schedule for access control device's access control point
(door) to remain open or remain closed.
Perform this task when you need to
congure the door status duraon schedule.
Steps
1. Click Access Control → Advanced Funcon → Access Control Parameters to enter Parameter
Sengs page.
2. Select a door to show its parameters on the right.
3. Click Status
Duraon Sengs to open the Status Duraon window.
4. Select a door status brush as Remain Open or Remain Closed.
-
Remain Open: The door will keep unlocked during the
congured me period. The brush is
marked as
.
-
Remain Closed: The door will keep locked during the
congured duraon. The brush is
marked as
.
5. Drag on the me line to draw a color bar on the schedule to set the duraon.
6. Oponal: Select the schedule me bar and click Copy to Whole Week to copy the me bar
sengs to the other days in the week.
7. Click Save to save the status duraon schedule.
8. Click Save to save the door parameters.
Access Controller User Manual
74