
Users Manual

3) Set the enrollment staon's IP address, port No., user name and password.
3) Click OK.
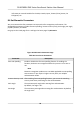
5. Click Get All or Get Parally.
Ge
t All
Import all person's informaon from the device to the plaorm.
Get Parally
Aer matching with the plaorm, all added person's informaon will be imported to the
plaorm.
The person informaon, including person details, person's ngerprint
informaon (if
congured), and the linked cards (if congured), will be imported to the selected organizaon.
7.5 Import Person Informaon in Batch
You can import the persons informaon in batch.
Steps
1. Enter the Person module.
2. Select an organizaon to import the person.
3. Click Ge
t from Device.
4. Congure the enrollment staon's informaon.
-
If the enr
ollment staon is connected with the plaorm via USB interface, click Loc
al.
1) Select Enrollment Staon from the drop-down list.
2) Click Login and set the enrollment staon's user name and password.
3) Click OK.
-
If the enr
ollment staon is connected with the plaorm via the network, click Remote.
1) Select Enrollment Staon from the drop-down list.
2) If the plaorm has not added an enrollment staon, click Login. If the plaorm has added
an enr
ollment staon, click Change to connect to another enrollment staon.
3) Set the enrollment staon's IP address, port No., user name and password.
3) Click OK.
5. Click Export Template and you can export the template to the PC.
6. Edit person's basic informaon and save.
7. Click Import. Select the
le edited in Step 6.
The edited basic informaon will be imported to the client soware.
What to do next
Aer the basic informaon is imported to the client soware, you should enroll other informaon
such as the face, ngerprint, etc. For details, see E
nroll via Client Soware .
DS-K1F600U-D6E Series Enrollment Staon User Manual
21