
Users Manual


1) Select Enrollment Staon as the ngerprint recorder from the drop-down list.
2) Click Login and set the enrollment staon's user name and password.
3) Click OK.
-
If the enrollment staon is connected with the plaorm via the network, click R
emote
1) Select Enrollment Staon as the ngerprint recorder from the drop-down list.
2) Click Login and se
t the enrollment staon's IP address, port No., user name and password.
3) Click OK.
8. Enroll the ngerprint.
1) Click Start to start enrollment.
2) Follow the instrucons on the enrollment staon to enroll the ngerprint.
3) Click Add to save the enrollment.
9. Conrm to add the person.
-
Click Add to add the person and close the Add Person window.
-
Click Add and New to add the person and connue to add other persons.
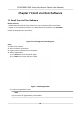
7.3 Enroll Card via Client Soware
Before You Start
• Download and install the client soware on your computer before enrollment.
•
Power on and acvate the device. For details about the acvaon, see Acvaon .
Follow the steps below to enroll card No.
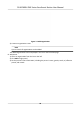
Figure 7-8 Flow Diagram of Enrolling Card
Steps
1. Power on the device.
2. Place the device on the desk.
3. Login the client soware on the computer.
4. Add an organizaon.
1) Click P
erson to enter the Person page.
2) Click Add on the upper le of the page.
DS-K1F600U-D6E Series Enrollment Staon User Manual
17