
Users Manual


The added organizaons will be displayed in the list on the le of the page.
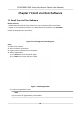
5. Add person.
1) Select an organizaon from the list on the le.
2) Click Add on righ
t panel.
3) Set the person's basic informaon, including the person's name, gender, email, tel, eecve
period, and remark.
Figure 7-3 Add Person
Note
Once the person informaon is expired, the credenals and access control sengs of the
per
son will be invalid and the person will have no authorizaon to access the doors.
6. Se
t enrollment staon.
-
If the enrollment staon is connected with the plaorm via USB interface, click Local
Collecon on the Add window.
1) Enable Verify by Device to check whether the device managed in the client can recognize
the face in the photo.
2) Select Enrollment Staon from the drop-down list.
3) Click Login and se
t the enrollment staon's user name and password.
4) (Oponal) Enable Face An-Spoong and set the liveness level according to your actual
needs.
5) Click OK.
-
If the enrollment
staon is connected with the plaorm via the network, click Remote
Collecon on the Add window.
DS-K1F600U-D6E Series Enrollment Staon User Manual
13