
Quick Start Guide

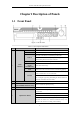
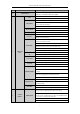
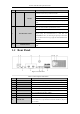
Table Of Contents

Network Video Recorder Quick Start Guide
8
No.
Name
Function Description
ENTER
Confirms selection in any of the menu modes.
Checks the checkbox fields.
Plays or pauses the video playing in playback mode.
Advances the video by a single frame in single-frame playback
mode.
Stops/starts auto switch in auto-switch mode.
9
JOG SHUTTLE Control
Moves the active selection up and down in a menu.
Cycles through different channels in live view mode.
In the playback mode: for DS-9600NI-ST/RT/XT series, use the
ring to jump 30s forward/backward in video files. For
DS-8600NI-ST series, use outer ring to speed up or slow down
the record files and inner ring to jump 30s forward/backward in
video files.
Controls the movement of the PTZ camera in PTZ control mode.
10
POWER ON/OFF
Long press the button for more than 3 seconds to turn on/off the
NVR.
1.2 Rear Panel
Figure 1. 2 Rear Panel
Table 1. 2 Description of Interfaces
No.
Item
Description
1
LAN1/LAN2 Interface
2 RJ-45 10/100/1000 Mbps self-adaptive Ethernet interfaces provided.
2
LINE IN
RCA connector for audio input.
3
AUDIO OUT
2 RCA connectors for audio output.
4
HDMI1/HDMI2
HDMI video output connector.
5
VGA1/VGA2
DB9 connector for VGA output. Display local video output and menu.
6
USB 3.0 interface
Universal Serial Bus (USB) ports for additional devices such as USB
mouse and USB Hard Disk Drive (HDD).
7
RS-232 Interface
Connector for RS-232 devices.
8
eSATA
Connects external SATA HDD, CD/DVD-RM.
9
Controller Port
D+, D- pin connects to Ta, Tb pin of controller. For cascading devices,
the first NVR’s D+, D- pin should be connected with the D+, D- pin of
the next NVR.