
Quick Start Guide


10 A D D I P C A M E R A S
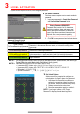
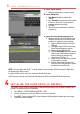
1. Right click a window in Live View mode to display the menu.
2. Online cameras in the same network segment will be detected and displayed in the camera list.
3. Select camera and click the button to add it (using DVR’s admin password). Or, click the
One-touch Adding button to add first two cameras in list of three or more (w/same admin password).
NOTE: Make sure the camera to add has been activated by setting the admin
password, and the camera’s admin password is the same as the DVR’s.
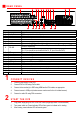
IP Camera Management Icons
Icon
Explanation
Icon
Explanation
Edit basic camera parameters
Upgrade the connected camera
Camera disconnected; click icon
to get camera’s exception
information
Delete the IP camera
Play connected camera’s live
video
Camera connected
11 A D D A N A L O G C A M E R A S
Adding Analog Cameras
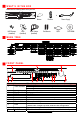
1. Connect analog camera(s) to the “Video In” BNC connectors.
Enabling Analog Cameras
1. Analog cameras are enabled by default; no further action is required.
Disabling Analog Cameras
NOTE: An additional IP camera can be added for each analog camera that is disabled. This
will require a system reboot.
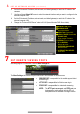
1. Go to MENU > CAMERAS > ANALOG (TAB).
2. Analog Camera List will display all enabled cameras.
DVR CAMERA CHANNELS
Cameras connected to DVR
PLAY
Play camera’s live video
EDIT (Pencil)
Change IP address (in LAN range)
CAMERA LIST (White)
Added cameras
LAN CAMERAS LIST (Yellow)
Detected cameras will appear here
NOTE: To change camera
name, go to OSD.