
Quick Start Guide
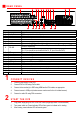


11 A D D A N A L O G C A M E R A S ( c o n t i n u e d )
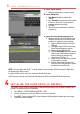
3. Disable analog cameras in the Analog Cameras Enable Status section:
• Uncheck the camera checkbox of any camera(s) you wish to disable.
• Check the Analog checkbox to disable/enable all analog cameras.
4. Press APPLY to save settings.
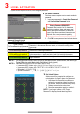
12 V I E W L I V E V I D E O
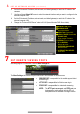
Live View displays real-time video.
13 S E T U P R E C O R D I N G
The system defaults to record video continuously at 8 fps, or at 15 fps when motion is detected.
Recording Schedule
Default is to record continuously every day. Do the following to change the recording schedule:
1. Go to MENU > RECORDING CONFIGURATION > SCHEDULE.
2. Choose CONTINUOUS or EVENT/(MOTION DETECTION) under the Type pull-down menu.
3. Use cursor to select (days will turn blue [continuous] or yellow [event/motion detect]) or deselect
(days will turn gray [off]) the calendar days you wish to record.
4. Apply time settings as desired.
5. Press APPLY.
Icons in the upper
rig
ht of screen show
each camera’s record and alarm status.
• Alarm (video loss, tampering, motion
detection, sensor alarm, or VCA
alarm)
• Record (manual record, continuous
record, motion detection, alarm, or
VCA triggered record)
• Event/Exception (event and
exception information appears at
lower-left corner of screen)
CAMERA LIST
(Analog)
STATUS
Camera enabled or disabled
ENABLE
Check checkbox to enable camera
ANALOG
Enable/disable all analog cameras
APPLY
Click to accept settings