
Manual


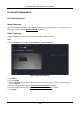

Table Of Contents
- Chapter 1 Startup
- Chapter 2 Live View
- Chapter 3 Playback
- Chapter 4 Search File
- Chapter 5 Configuration (Easy Mode)
- Chapter 6 Configuration (Expert Mode)
- 6.1 System Configuration
- 6.2 Network Configuration
- 6.3 Camera Management
- 6.3.1 Network Camera
- Add Automatically Searched Online Network Camera
- Add Network Camera Manually
- Edit Network Camera
- Upgrade Network Camera
- Configure Advanced Camera Parameters
- Add Network Camera Through PoE
- Configure Channel Type
- Sort Channel Order
- Configure Remote Settings
- Import/Export IP Camera Configuration File
- Advanced Settings
- 6.3.2 Display Settings
- 6.3.3 Privacy Mask
- 6.3.1 Network Camera
- 6.4 Event Configuration
- 6.5 Recording Management
- Chapter 7 Maintenance
- Chapter 8 Alarm
- Chapter 9 Web Operation
- Chapter 10 Appendix

Network Video Recorder User Manual
52
Configure Channel Type
You can disable a PoE channel to additionally increase a normal IP channel resource.
Go to Configuration → Camera → Camera → PoE Binding Configuration, and set the PoE channel
as your desire.
Figure 6-12 PoE Binding Configuration
Sort Channel Order
Go to Configuration → Camera → Camera. Refer to Sort Channel Order for details.
Configure Remote Settings
Go to Configuration → Camera → Camera. Refer to Configure Remote Settings for details.
Import/Export IP Camera Configuration File
The information of added network camera can be generated into an excel file and exported to the
local device for backup, including the IP address, port, password of admin, etc. And the exported
file can be edited on your computer, like adding or deleting the content, and copy the setting to
other devices by importing the excel file to it.
Before You Start
Connect a backup device, such as a USB flash drive, to your video recorder.
Steps
1. Go to Configuration → Camera → Camera.
2. Click More.
3. Click Export/Import to export/import configuration files to the connected backup device.
4. Set the storage device and folder path.
5. Click Export/Import.